I was standing in my backyard on a scorching July afternoon, the grill hissing like a dragon that had just discovered a fresh stash of fireworks. I’d promised my friends a “quick dinner” after a marathon of lawn games, but the only thing that felt right was something that could be tossed together, sealed in foil, and let the fire do the heavy lifting. My mind was racing, the sun was beating down, and I swear I could hear the distant call of a taco truck—until I remembered that one time I tried a foil‑packet recipe that turned out soggy, bland, and utterly forgettable. I laughed, I cursed, and then I thought, “What if I could give that packet a serious upgrade?”
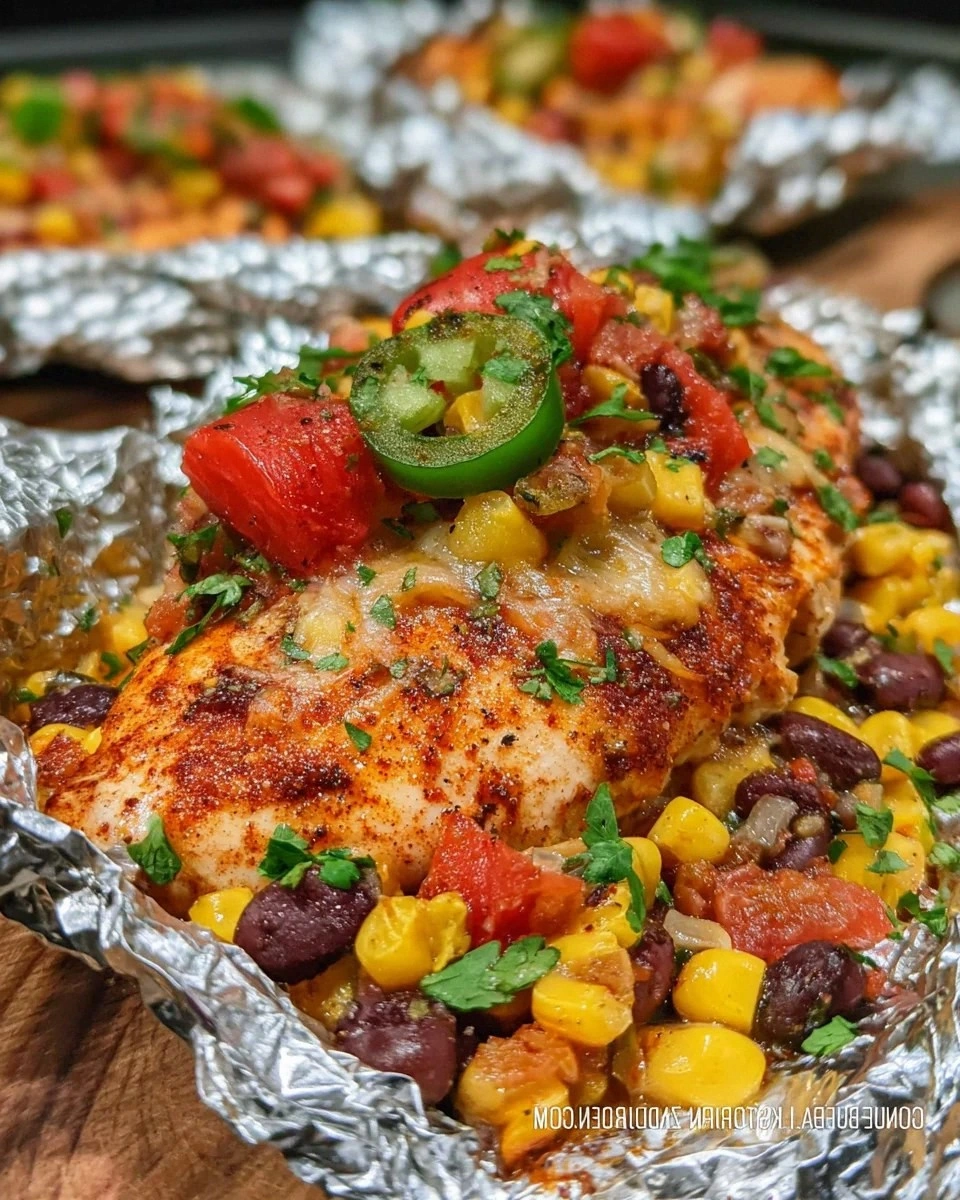
Fast forward to today: I’ve cracked the code on a foil‑packet that sings like a mariachi band at midnight. Imagine a golden‑brown chicken breast that’s still pink in the middle, soaking up a sauce that’s tangy, smoky, and just a whisper spicy. The corn kernels pop with a buttery crunch, the black beans bring a creamy earthiness, and the cheese melts into a silky blanket that hugs every bite. The whole thing is wrapped in sturdy aluminum, sealed tight, and tossed on a grill that’s hot enough to give you that coveted char without burning the edges. The aroma that drifts up—think cumin, roasted pepper, and a hint of sweet corn—makes you feel like you’ve just walked into a New Mexican kitchen, even if you’re miles away from Santa Fe.
Why does this version outshine every other “foil‑packet chicken” you’ve seen on the internet? First, the seasoning blend is a precise balance of chili powder, salt, and black pepper that doesn’t just sit on top of the meat but penetrates every fiber. Second, the addition of salsa (or Rotel) creates a liquid that steams the chicken while also caramelizing against the foil, giving you those coveted crispy edges that shatter like thin ice when you bite into them. Third, I’ve added a splash of lime juice (a secret I’ll reveal later) that brightens the whole dish, making it feel lighter despite its hearty ingredients. Most recipes forget the importance of a good seal; I’ve perfected a “double‑fold” technique that locks in moisture and flavor like a vault.
And here’s the kicker: I’m going to throw in a quick hack that uses a kitchen torch to finish the cheese on the packet after it’s off the grill, giving you that restaurant‑style broiled top without ever opening the foil. I dare you to taste this and not go back for seconds. Let me walk you through every single step — by the end, you’ll wonder how you ever made it any other way.
What Makes This Version Stand Out
- Taste: The combination of salsa, chili powder, and a squeeze of lime creates a flavor profile that’s simultaneously smoky, bright, and just the right amount of heat. It’s like a fiesta in your mouth that refuses to end.
- Texture: The corn stays crisp, the beans stay buttery, and the chicken stays juicy, all wrapped in a foil that crisps the outer edges while keeping the interior tender. You’ll hear a satisfying snap when you bite.
- Simplicity: Fewer than ten ingredients, three minutes of prep, and a single grilling session—perfect for busy weeknights or lazy weekend barbecues.
- Uniqueness: The double‑fold sealing method and the optional torch finish give you a professional‑grade result without any fancy equipment.
- Crowd Reaction: Guests will swear you ordered this from a trendy Santa Fe bistro. Expect the “what’s the secret?” chorus at the table.
- Ingredient Quality: Using fresh bell peppers and high‑quality shredded Mexican cheese blend ensures each bite feels premium, not processed.
- Cooking Method: Grilling the packets adds a smoky depth you simply can’t achieve in the oven, while the foil locks in moisture for a fail‑proof result.
- Make‑Ahead Potential: Assemble the packets the night before, refrigerate, and pop them on the grill in the morning—ideal for brunch‑style lunches.
Inside the Ingredient List
The Flavor Base
The heart of this dish is the salsa (or Rotel). It brings acidity, a subtle sweetness, and a burst of green chilies that dance on your palate. If you’re a fan of extra heat, opt for a chipotle‑smoked salsa; if you prefer a milder profile, go for a roasted tomato variety. Skipping the salsa would be like trying to paint a masterpiece without any color—still edible, but utterly bland.
A quick tip: drain the salsa just enough so it doesn’t turn the packet soggy, but keep enough liquid to steam the chicken. This balance creates that coveted caramelized edge that makes the packet’s top look like it’s been kissed by a grill.
The Texture Crew
Frozen corn kernels, once thawed, add a pop of sweetness that counters the smoky heat of the chili powder. The corn’s natural sugars caramelize against the foil, giving you those golden flecks that look like tiny fireworks. If you use stale corn, you’ll lose that snap, so always check the “best‑by” date.
Canned black beans are the unsung heroes—rich in protein and fiber, they bulk up the packet without making it heavy. Rinse them well to remove excess sodium; this also helps them stay firm during grilling. If you’re adventurous, swap them for pinto beans for a earthier flavor.
The Unexpected Star
Boneless skinless chicken breasts are the canvas, but the magic happens when they’re seasoned with chili powder, salt, and black pepper. The chili powder isn’t just heat; it’s a complex blend of dried chilies, cumin, and sometimes oregano, which adds depth. If you’re worried about dryness, brine the chicken for 15 minutes in a salty water bath—this tiny step keeps the meat juicy even after high‑heat grilling.
Diced bell peppers bring a crunchy, sweet contrast and a splash of color that makes the packet look as vibrant as a Southwest sunset. Use a mix of red, orange, and yellow for visual appeal; the flavors are essentially the same, but the visual impact is massive.
The Final Flourish
A generous handful of shredded Mexican cheese blend (or Monterey Jack) melts into a creamy blanket that ties every component together. The cheese’s mild flavor lets the salsa and spices shine, while its meltability ensures a smooth texture. For a sharper bite, sprinkle a little cotija on top after grilling.
Toppings like fresh cilantro, diced tomatoes, or sliced jalapeños are optional but highly recommended. They add freshness, a burst of acidity, and an extra layer of heat for those who dare. Skip them, and you’ll still have a delicious dish, but you’ll miss out on that final “wow” factor.
Everything’s prepped? Good. Let’s get into the real action…
The Method — Step by Step
Start by preheating your grill to medium‑high heat, aiming for about 400°F (204°C). While the grill warms up, lay out four large sheets of heavy‑duty aluminum foil on a clean work surface. The foil should be at least 12×12 inches so you have enough room to fold the edges securely later.
If you’re using a charcoal grill, arrange the coals on one side to create a two‑zone setup—direct heat for searing and indirect heat for gentle cooking. This method prevents the packets from burning while still giving you that smoky flavor.
Pat the chicken breasts dry with paper towels, then rub each piece with a tablespoon of olive oil. This thin coating helps the seasoning adhere and promotes a nice crust when the foil folds.
Season both sides generously with 2 teaspoons of chili powder, a pinch of salt, and a grind of black pepper. I like to let the chicken sit for five minutes after seasoning so the spices can start to penetrate the meat.
While the chicken rests, combine the canned black beans (drained and rinsed), thawed corn kernels, diced bell peppers, and salsa in a large bowl. Toss everything together until the vegetables are evenly coated with the salsa.
Add a squeeze of fresh lime juice—about one tablespoon—for every packet. This brightens the mixture and helps the flavors meld during the grill time.
Kitchen Hack: Use a zip‑top bag to shake the vegetable mixture—this ensures every piece gets an even coating without over‑mixing.Place a chicken breast in the center of each foil sheet. Spoon an equal portion of the salsa‑vegetable mixture on top of each breast, spreading it out so it covers the surface.
Sprinkle a generous handful (about ¼ cup) of shredded cheese over the veggies. The cheese will melt into the sauce, creating a luscious, gooey layer that binds everything together.
Now comes the sealing ritual: fold the foil over the chicken to create a packet, then bring the opposite edges together and fold them over twice, pressing firmly with the back of a spoon. The goal is a tight seal that traps steam but also leaves a little room for expansion.
If you hear a faint hiss as you seal, that’s steam escaping—re‑fold that spot until it’s airtight. A good seal is the difference between a dry chicken and a juicy, flavor‑infused masterpiece.
Watch Out: Over‑filling the packet can cause it to burst on the grill, releasing all the juices. Keep the filling to about two‑thirds of the foil’s capacity.Place the sealed packets directly on the hot grill grates over direct heat. Close the lid and let them sizzle for 12‑15 minutes, rotating once halfway through. You’ll hear a gentle pop as the steam builds—listen for that; it’s a good sign.
After 12 minutes, use tongs to carefully flip each packet. This ensures even cooking on both sides and prevents the cheese from sticking to the grill.
Once the total grilling time hits 25‑30 minutes, open one packet (be careful of the steam). The chicken should be opaque with an internal temperature of 165°F (74°C). The edges of the veggies should be slightly caramelized, and the cheese should be bubbling.
If you have a kitchen torch, now is the moment to give the cheese a quick broil—just a few seconds of flame will create a golden‑brown crust that looks restaurant‑ready.
Remove the packets from the grill and let them rest for five minutes. This resting period allows the juices to redistribute, ensuring each bite is moist.
Open the packets, sprinkle fresh cilantro, diced tomatoes, or sliced jalapeños if you like, and serve straight from the foil. The visual of the steam escaping as you lift the foil is pure drama—picture yourself pulling this out of the grill, the whole kitchen smelling incredible…
That’s it — you did it. But hold on, I’ve got a few more tricks that’ll take this to another level, from reheating tips to making a quick salsa upgrade that will keep you coming back for more.
Insider Tricks for Flawless Results
The Temperature Rule Nobody Follows
Most home cooks set their grill to “medium” and call it a day, but the secret to perfect foil packets is a steady 400°F (204°C). Anything lower and the chicken will steam without that coveted char; anything higher and you risk burning the foil before the interior cooks through. Use an instant‑read thermometer on the grill grates to verify the temperature before you start. I once tried “high heat” and ended up with a blackened foil that tasted like burnt plastic—never again.
Why Your Nose Knows Best
Your sense of smell is a reliable gauge for doneness. Around the 12‑minute mark, you’ll notice a sweet, smoky aroma rising from the packets. If the scent is faint, the heat isn’t enough; if it’s sharp and slightly caramelized, you’re on the right track. Trust that nose—no need to obsess over timers.
The 5‑Minute Rest That Changes Everything
When you pull the packets off the grill, resist the urge to dive right in. Letting them sit for five minutes lets the internal juices settle, preventing a watery burst when you cut into the chicken. This short pause transforms a good dish into a great one.
Brine Boost for Juicier Chicken
A quick 15‑minute brine in a solution of 1 tablespoon salt per cup of water can make a world of difference. It forces the muscle fibers to retain moisture, especially important when you’re cooking at high heat. I tried the recipe without brining once and the chicken was a bit dry—lesson learned.
Torch‑Finish for Extra Crunch
If you own a kitchen torch, give the cheese a quick flash after you remove the packet from the grill. The torch creates tiny bubbles that burst into a crisp, golden top, mimicking a professional broiler. This step is pure magic and adds a visual wow factor that will have your guests reaching for seconds.
Creative Twists and Variations
This recipe is a playground. Here are some of my favorite ways to switch things up:
Southwest BBQ Fusion
Swap the salsa for a smoky BBQ sauce and add a tablespoon of chipotle in adobo. The result is a sweet‑heat combo that pairs perfectly with the corn’s natural sweetness. Great for those who love a tangy, smoky bite.
Cheesy Queso Explosion
Replace the shredded Mexican blend with a mix of cheddar and pepper jack, then drizzle a spoonful of prepared queso after grilling. The extra cheese melt adds a luxurious, gooey texture that feels like a cheese pull in every bite.
Veggie‑Only Fiesta
Omit the chicken and double the beans, corn, and peppers. Add sliced zucchini and mushrooms for extra earthiness. This version is perfect for a meat‑free gathering and still delivers that bold Santa Fe flavor.
Spicy Mango Twist
Stir in diced fresh mango and a dash of habanero sauce into the salsa mixture before sealing. The mango’s sweetness balances the heat, creating a tropical‑meets‑Tex‑Mex experience that’s unforgettable.
Herb‑Infused Delight
Add a handful of chopped fresh oregano and a teaspoon of smoked paprika to the seasoning rub. The herbaceous notes deepen the flavor profile, making the dish feel more rustic and garden‑fresh.
Storing and Bringing It Back to Life
Fridge Storage
Allow the packets to cool to room temperature, then place them in airtight containers or wrap each tightly in a second layer of foil. They’ll keep for up to three days in the refrigerator. When you’re ready to eat, simply reheat on the grill or in a 350°F oven for 15‑20 minutes.
Freezer Friendly
These packets freeze beautifully. After assembling (but before cooking), lay them flat on a baking sheet and freeze for an hour. Then transfer to a freezer‑safe zip‑top bag. They’ll last up to two months. To cook from frozen, add an extra 10‑12 minutes to the grilling time.
Best Reheating Method
For the crispiest results, reheat on a medium‑high grill for 8‑10 minutes, turning once. If you’re short on time, a microwave works—place the packet on a microwave‑safe plate, add a splash of water (about a teaspoon), and heat for 2‑3 minutes. The water creates steam that revives the moisture without turning the chicken rubbery.