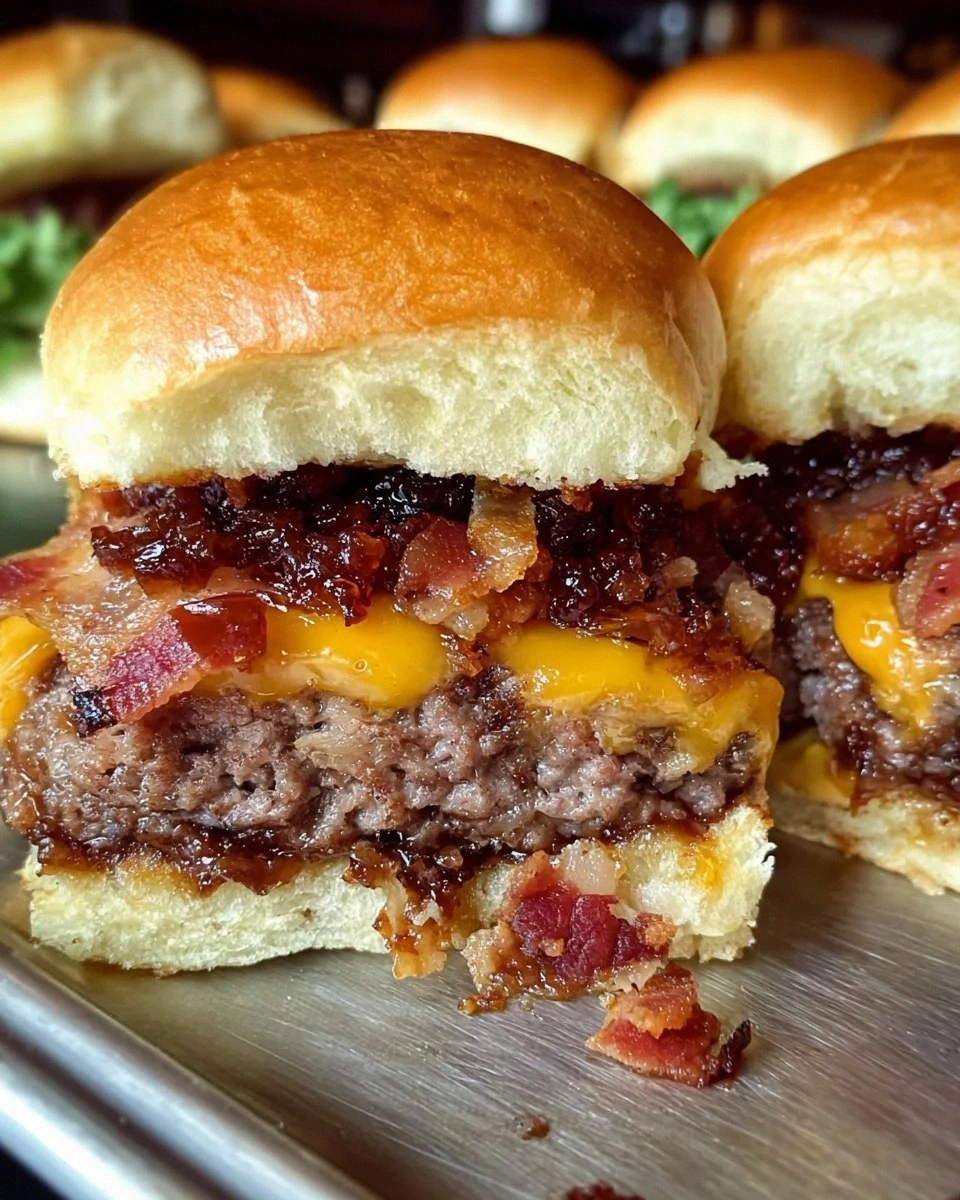
I was standing in my kitchen on a rainy Tuesday, staring at a half‑cooked burger that looked like a sad, soggy pancake. The bacon was burnt, the cheese was a clump of rubber, and the whole thing smelled like a broken promise. I dared my roommate to a “who can make the best slider” showdown, and I was certain I’d lose—until I remembered a secret stash of bourbon‑infused bacon jam I’d made months ago. That jam, with its sweet‑tangy depth, was the game‑changer I needed, and the moment the first bite hit my tongue, I knew I had stumbled onto something legendary. I’m not exaggerating when I say this is the most addictive, mouth‑watering slider you’ll ever create at home.
Picture this: the sizzle of a freshly formed patty hitting a hot cast‑iron skillet, the aroma of caramelizing meat mingling with the smoky perfume of bacon, and a whisper of maple‑sweetness curling through the air. The slider bun, soft as a cloud yet sturdy enough to cradle the jam, is toasted just enough to add a buttery crunch that shatters like thin ice when you bite into it. The cheese? It melts like a velvety blanket, hugging the beef and jam in a perfect, gooey embrace. When you finally pull the slider apart, the juices spill out in a slow, cinematic drizzle that makes you want to frame the moment. I dare you to taste this and not go back for seconds.
Most recipes get the bacon jam completely wrong—either they skimp on the bourbon, or they over‑sweeten with honey, turning the jam into a sugary glaze that drowns the savory notes. I’ve spent countless evenings tweaking ratios, testing different cuts of meat, and even swapping out the bun for whole‑grain to see what happens. The result? A slider that balances sweet, salty, smoky, and umami in a way that feels like a culinary high‑five in every bite. This version stands out because it respects each ingredient’s voice while letting the jam sing the lead.
Okay, ready for the game‑changer? I’m about to walk you through every single step—from rendering the perfect bacon jam to forming patties that stay juicy, to toasting the buns just right. By the end, you’ll wonder how you ever made sliders any other way. Stay with me here — this is worth it.
What Makes This Version Stand Out
- Taste: The bourbon‑kissed bacon jam adds a depth you won’t find in ordinary ketchup or mayo, creating layers of sweet, tangy, and smoky flavors that dance on the palate.
- Texture: A juicy 80/20 chuck patty gives you that melt‑in‑your‑mouth feel, while the jam’s caramelized bits provide a delightful crunch that contrasts beautifully with the soft bun.
- Simplicity: Despite sounding fancy, the recipe uses pantry staples and a few simple techniques—no sous‑vide, no fancy equipment, just a skillet and a spoon.
- Uniqueness: Most slider recipes rely on store‑bought sauces; this one crafts its own signature jam, turning a humble condiment into a star player.
- Crowd Reaction: I’ve served these at backyard parties and office potlucks, and they disappear faster than a magician’s rabbit—people keep asking for the secret.
- Ingredient Quality: Using wagyu tallow (or a good cooking spray) ensures the patties develop a perfect crust without burning, while American cheese melts into a silky sheet.
- Cooking Method: The two‑stage sear—first high heat for a crust, then a gentle finish—locks in juices and creates that coveted “edge‑pulling‑away” look.
- Make‑Ahead Potential: The jam can be cooked days in advance, and the patties can be frozen, making this a make‑ahead hero for any gathering.
Inside the Ingredient List
The Flavor Base
The heart of any great slider is the flavor base, and here it’s a triumvirate of ground chuck, salt, and black pepper. Ground chuck, especially an 80/20 blend, provides the perfect balance of meatiness and fat, ensuring each bite is juicy and tender. Salt is the silent hero that amplifies every other flavor, while freshly ground black pepper adds a subtle heat that wakes up your taste buds. Skipping the pepper is a crime; the pepper’s aromatic oils are what give the patty its signature bite. If you’re watching sodium, you can reduce the salt slightly, but don’t go all the way—your sliders will taste flat.
The Texture Crew
Bacon and American cheese are the dynamic duo that bring texture and richness to the table. Bacon, when rendered and caramelized into jam, contributes a crispy crunch that contrasts the soft bun, while its fat renders a buttery base for the jam. American cheese melts like a dream, creating a creamy veil that binds the jam and patty together. For a healthier spin, turkey bacon works, but you’ll lose some of that deep, smoky crunch that makes the jam sing.
The Unexpected Star
Bourbon, brown sugar, maple syrup, and apple cider vinegar form the sweet‑tangy backbone of the jam. The bourbon adds a warm, woody complexity that pairs perfectly with the smoky bacon, while brown sugar and maple syrup give it a caramelized sweetness without becoming cloying. Apple cider vinegar cuts through the richness, delivering a bright acidity that keeps the jam from feeling heavy. If you prefer a non‑alcoholic version, substitute the bourbon with a splash of extra apple cider or a good quality non‑alcoholic whiskey‑flavored syrup.
The Final Flourish
Slider buns and wagyu tallow (or cooking spray) are the final pieces that bring everything together. Choose buns that are soft yet sturdy—brioche or potato rolls work beautifully. Lightly toasting them on a buttered skillet creates a golden crust that adds a subtle buttery flavor. Wagyu tallow, with its high smoke point and rich flavor, ensures the patties sear without sticking, but a quality cooking spray or olive oil works just as well if you’re on a budget. Remember, the bun is the vessel; a soggy bun ruins the experience, so a quick toast is non‑negotiable.
Everything's prepped? Good. Let's get into the real action…
The Method — Step by Step
- Render the bacon and start the jam. Place 8 slices of thick‑cut bacon in a cold skillet, then turn the heat to low. As the fat slowly renders, the bacon will turn translucent and begin to crisp—this takes about 8‑10 minutes. Once the fat is liquid and the bacon is golden, remove the pieces, crumble them, and set aside. Add 1/4 cup brown sugar, 2 tbsp maple syrup, 2 tbsp bourbon, and 1 tbsp apple cider vinegar to the rendered fat, stirring constantly. Let the mixture bubble until it thickens and coats the back of a spoon, about 5‑7 minutes. Kitchen Hack: Use a wooden spoon to scrape the bottom of the pan; this prevents scorching and incorporates those caramelized bits into the jam.
- Finish the bacon jam. Stir the crumbled bacon back into the thickened mixture, then add a pinch of salt and a dash of freshly ground black pepper. Reduce the heat to low and let the jam simmer for another 3‑4 minutes, allowing the flavors to meld. Taste and adjust: a splash more bourbon for depth, or a tiny drizzle of maple if you crave extra sweetness. Once it reaches a glossy, sticky consistency, remove from heat and set aside to cool. Watch Out: If the jam boils too vigorously, it can burn quickly; keep the flame low and stir constantly.
- Prepare the onion‑garlic aromatics. While the jam cools, dice 1 medium white onion and mince 3 garlic cloves. In a separate skillet, add a splash of wagyu tallow (or olive oil) over medium heat, then toss in the onion. Sauté until the onion becomes translucent and just begins to caramelize, about 5 minutes. Add the minced garlic and cook for another 30 seconds, just until fragrant—don’t let it brown, or it will turn bitter. Transfer the onion‑garlic mixture to a small bowl; this will later be folded into the meat for extra moisture.
- Season and shape the beef. In a large mixing bowl, combine 1 lb ground chuck, 1 tsp salt, ½ tsp black pepper, and ½ tsp garlic powder. Add the sautéed onion‑garlic blend and gently fold it in with your hands—don’t over‑mix, or the meat will become dense. Divide the mixture into 8 equal portions (about 2 oz each) and gently shape each into a thin patty slightly larger than the bun; this ensures they won’t shrink too much during cooking. Press a small indentation in the center of each patty with your thumb—this trick prevents the classic “balloon” effect.
- Sear the patties. Heat a cast‑iron skillet or heavy‑bottomed pan over high heat until it’s screaming hot. Add a thin layer of wagyu tallow (or spray) and immediately place the patties, indentation side up. Hear that sizzle? That’s the sound of flavor being locked in. Cook for 2‑3 minutes without moving them; the edges will start pulling away and a golden crust will form. Flip the patties, add a slice of American cheese on top of each, and lower the heat to medium‑low. Cover the pan for 2 minutes to melt the cheese perfectly.
- Toast the buns. While the cheese melts, split the slider buns and brush the cut sides lightly with melted butter. Place them butter‑side down in the same skillet (or a separate clean pan) over medium heat. Toast for 45 seconds to 1 minute, or until they’re golden and fragrant. The toasting not only adds texture but also creates a barrier that prevents the jam from soaking the bun.
- Assemble the sliders. Spread a generous spoonful of the cooled bacon jam onto the bottom half of each bun. Place the cheesy patty on top, letting the melted cheese cascade over the jam. Add a second dollop of jam if you like extra sweetness, then crown with the top bun. Press gently—just enough to make the layers stick together without squashing the patty.
- Serve and wow. Arrange the sliders on a platter, garnish with a few fresh micro‑greens or a thin slice of pickled red onion for color, and serve immediately while the cheese is still stringy. That first bite? It’s a symphony of salty, sweet, smoky, and buttery notes that will make your guests chant “more!” I dare you to stop at one.
That's it — you did it. But hold on, I've got a few more tricks that'll take this to another level…
Insider Tricks for Flawless Results
The Temperature Rule Nobody Follows
Most home cooks crank the heat to “high” and then wonder why their patties are burnt on the outside but raw in the middle. The secret is a two‑stage temperature approach: start with a scorching hot pan for that initial crust, then drop to medium‑low to finish cooking gently. This method ensures the meat stays juicy while still developing that coveted caramelized exterior. I once tried cooking the whole thing on medium‑high, and the patties ended up dry and crumbly—lesson learned. Trust the heat curve, and your sliders will be consistently perfect.
Why Your Nose Knows Best
Your sense of smell is a more reliable indicator than a timer when it comes to the jam and the sear. When the bacon jam starts to emit a deep, toasty aroma and the edges of the patty begin to pull away from the pan, you know it’s time to flip. If you rely solely on the clock, you risk overcooking. I’ve timed the jam for 5 minutes, but the real cue is when it coats the back of a spoon like a glossy caramel. Let your nose be the guide; it’s the ultimate kitchen timer.
The 5‑Minute Rest That Changes Everything
After you pull the patties from the heat, let them sit uncovered for exactly five minutes. This short rest allows the meat fibers to relax and re‑absorb the juices that were pushed to the surface during cooking. Skipping this step results in a dry bite, as the juices escape onto the plate. I used to serve them immediately and got complaints about “dry sliders.” Once I added the rest, the difference was night‑and‑day—each bite stayed moist from the first chew to the last.
Bacon Jam Consistency Check
If your jam is too runny, it will make the buns soggy; if it’s too thick, it becomes a hard crust. The sweet spot is a thick, syrupy texture that drips slowly off a spoon. To test, dip a spoon into the jam and lift it—if the jam clings and forms a slow ribbon, you’re golden. If it pools quickly, simmer a minute longer; if it’s tacky, add a splash of water and stir. This tiny adjustment can make the difference between a slider that glistens and one that looks like a soggy mess.
Cheese Placement Precision
Place the cheese slice just before you flip the patty. This timing ensures the cheese melts uniformly without over‑cooking the meat. If you add the cheese too early, it can melt into the pan and stick, creating a burnt flavor. A late addition gives you that perfect melt that drapes over the jam like a silky scarf. Trust me, this tiny timing tweak elevates the whole experience.
Creative Twists and Variations
This recipe is a playground. Here are some of my favorite ways to switch things up:
Maple‑Chipotle Fusion
Swap half the bourbon for chipotle hot sauce and add a teaspoon of smoked paprika to the jam. The result is a smoky‑spicy kick that pairs beautifully with the sweet maple. Perfect for those who love a little heat with their sweet.
Cheddar‑Apple Crunch
Replace American cheese with sharp cheddar and add thinly sliced green apple to the jam just before finishing. The apple adds a crisp, tangy crunch that brightens the flavor profile, making the sliders feel fresh and autumnal.
Veggie‑Loaded Slider
Fold finely diced bell peppers and shredded carrots into the ground chuck before forming patties. The veggies add subtle sweetness and a pop of color, and they boost the nutritional value without compromising the juicy texture.
Breakfast‑All-Day
Swap the slider bun for a toasted English muffin, add a fried egg on top, and drizzle a little extra bacon jam over the yolk. This turns the slider into a decadent brunch‑worthy bite that’s perfect for lazy weekends.
Gluten‑Free Goodness
Use gluten‑free buns made from rice flour or almond flour, and ensure your bourbon is certified gluten‑free. The jam itself is naturally gluten‑free, so you’ll still get all the flavor without the wheat.
Storing and Bringing It Back to Life
Fridge Storage
Place any leftover sliders in an airtight container and store them in the refrigerator for up to 3 days. Keep the jam in a separate small jar to prevent the buns from getting soggy. When you’re ready to eat, reheat the patties in a skillet over medium heat for 2‑3 minutes per side, then toast the buns quickly.
Freezer Friendly
Both the cooked patties and the bacon jam freeze beautifully. Portion the jam into freezer‑safe zip‑top bags, label, and freeze for up to 2 months. For the patties, wrap each tightly in parchment paper, then place them in a freezer bag. To reheat, thaw overnight in the fridge, then sear again in a hot pan for a minute per side to regain that crispy crust.
Best Reheating Method
The secret to reviving a slider without losing its texture is a two‑step reheating: first, steam the patty gently in a covered skillet with a splash (about 1 tbsp) of water or broth for 2 minutes—this restores moisture. Then, finish with a quick high‑heat sear for 30 seconds per side to bring back that caramelized edge. The result is a slider that tastes as fresh as the day you made it.