Picture this: it’s a rainy Saturday, you’re stuck inside, the TV is blaring a rerun of a cooking show, and a sudden, insistent craving for something that feels like a hug wrapped in chocolate hits you hard. I was in the middle of a disastrous attempt at a classic chocolate chip cookie that turned out more like a flat, chewy pancake, when a friend dared me to make something truly decadent. I said, “Challenge accepted,” and the kitchen became a battlefield of butter, cocoa, and cherry jam. The air filled with the intoxicating aroma of melted chocolate and toasted sugar, and the sound of the mixer whirring was like a drumroll announcing a sweet victory.
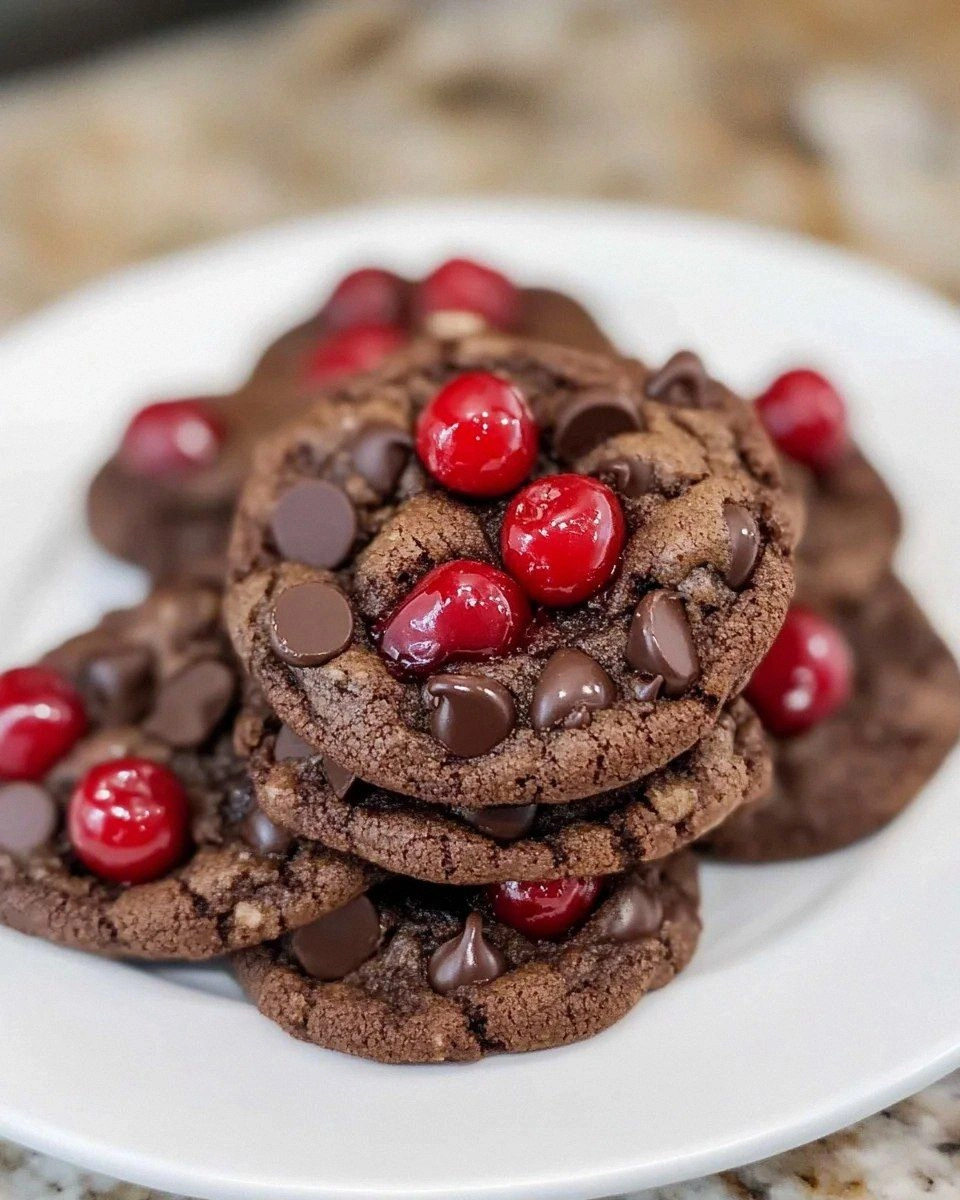
The first bite of those Black Forest cookies I eventually pulled from the oven was a revelation—soft, buttery dough that crumbled like a freshly fallen snowflake, a burst of tart cherry jam that cut through the richness, and a glossy coat of dark chocolate that snapped with a satisfying crack. I could hear the faint sighs of my taste buds as they tried to keep up. The texture was a perfect balance: a tender interior that held its shape, a crisp edge that shivered like thin ice, and a velvety chocolate coating that lingered like a lingering melody. That moment made me realize most recipes get this completely wrong, either by overloading the dough with cocoa or by skimping on the jam, leaving you with a cookie that’s either bitter or bland.
What sets this version apart is a secret technique I stumbled upon while reading a German pastry forum: chilling the dough for exactly 30 minutes before the first bake, then a quick flash‑freeze in the freezer for 10 minutes before the second bake. This double‑chill method locks in moisture, giving the cookies a tender crumb while preventing the chocolate from melting into a greasy puddle. I also swapped ordinary cocoa powder for Dutch‑process cocoa, which adds a deeper, almost wine‑like richness that you won’t find in the typical supermarket version. The result? A cookie that sings with layers of flavor, a texture that’s both airy and satisfying, and a visual appeal that could win a bake‑off on its own.
Now, I’m daring you to taste this and not go back for seconds. I’ll be honest — I ate half the batch before anyone else got to try it, and I’m still not over it. This isn’t just a cookie; it’s a celebration of every sweet craving you’ve ever had, bottled up in a bite‑size masterpiece. Let me walk you through every single step — by the end, you’ll wonder how you ever made it any other way.
What Makes This Version Stand Out
- Flavor Depth: Dutch‑process cocoa and a splash of kirsch give the cookies a sophisticated, slightly boozy undertone that elevates the classic Black Forest profile.
- Texture Harmony: The double‑chill technique creates a tender, cake‑like interior while the outer edge crisps up just enough to snap pleasantly.
- Simplicity: Despite the gourmet vibe, the ingredient list is pantry‑friendly, and the steps are broken down so even a novice can nail it.
- Visual Wow Factor: Each cookie is a mini‑art piece—dark chocolate glaze, a dollop of glossy cherry jam, and a dusting of powdered sugar that looks straight out of a bakery window.
- Crowd Reaction: Expect gasps, compliments, and the inevitable “Can I have the recipe?” from anyone who takes a bite.
- Ingredient Quality: Using high‑quality butter and real cherry preserves makes the difference between “good” and “legendary.”
- Cooking Method: The two‑stage bake (first at a lower temp, then a quick high‑heat finish) ensures perfect rise and a glossy finish without burning.
- Make‑Ahead Potential: These cookies keep beautifully for up to a week, and you can freeze them for a month without losing any of that buttery magic.
Alright, let's break down exactly what goes into this masterpiece...
Inside the Ingredient List
The Flavor Base
Unsalted butter (1 cup, softened): This is the backbone of the cookie’s richness. Butter provides moisture, flavor, and that melt‑in‑your‑mouth crumb. If you substitute margarine, you’ll lose the buttery aroma and the texture will feel greasy. For the best result, use European‑style butter with a higher fat content.
Granulated sugar (1 cup) & Brown sugar (½ cup): The combination gives a balanced sweetness and a subtle caramel note from the molasses in brown sugar. Skipping the brown sugar will make the cookie taste flat, while using only brown sugar can lead to a denser, moister crumb that may not crisp at the edges.
Vanilla extract (2 tsp): A tiny splash of vanilla lifts the cocoa and cherry flavors, creating a harmonious backdrop. If you have pure vanilla bean, scrape the seeds for an even more aromatic profile.
The Texture Crew
All‑purpose flour (2 cups): Flour provides structure. Using cake flour would make the cookie too tender, while bread flour would make it overly chewy. Choose a high‑quality, bleached flour for a lighter crumb.
Unsweetened cocoa powder (½ cup, Dutch‑process): Dutch‑process cocoa is alkalized, giving a deeper, smoother chocolate flavor and a darker color. Regular natural cocoa can taste more acidic and result in a lighter‑colored cookie.
Baking soda (1 tsp) and Salt (½ tsp): Baking soda helps the cookie spread just enough, while salt amplifies all the other flavors. Forgetting the salt is a rookie mistake that leaves the cookie tasting bland.
The Unexpected Star
Cherry jam (1 cup): The jam adds a bright, tart contrast that cuts through the chocolate richness. Opt for a jam with real cherries and minimal added sugar for the most authentic flavor. If you can’t find cherry jam, a good quality preserves or even a homemade compote works beautifully.
Kirsch (1 tbsp, optional): This cherry brandy injects a subtle boozy depth that mirrors the traditional Black Forest cake. It’s optional, but a splash will make the jam flavor pop even more. If you prefer to keep it alcohol‑free, a teaspoon of almond extract can mimic the complexity.
The Final Flourish
Dark chocolate chips (1 cup): Dark chocolate provides a bittersweet snap that balances the sweet jam. Choose at least 70% cacao for that luxurious snap; lower percentages will melt too quickly and lose the desired crunch.
Heavy whipping cream (1 cup) & Powdered sugar (2 tbsp): Whipped cream is the classic topping for Black Forest treats. It adds a light, airy finish that contrasts the dense cookie. Whip until soft peaks form; over‑whipping will turn it buttery.
Eggs (2 large): Eggs bind the dough and add lift. Using room‑temperature eggs ensures they incorporate smoothly, preventing a lumpy batter.
Everything's prepped? Good. Let's get into the real action...
The Method — Step by Step
-
In a large mixing bowl, cream together the softened butter, granulated sugar, and brown sugar until the mixture is light, fluffy, and pale yellow. This should take about 3‑4 minutes on medium speed. The scent should be sweet and buttery, like fresh‑baked pretzels. Power tip: Scrape down the sides of the bowl frequently to ensure an even cream.
-
Add the eggs one at a time, beating well after each addition. Then stir in the vanilla extract and, if you’re feeling adventurous, the kirsch. The batter will look glossy and a little thick; that’s exactly what we want. Watch the color: It should turn a richer golden hue, indicating the fats are fully emulsified.
-
In a separate bowl, whisk together the flour, Dutch‑process cocoa powder, baking soda, and salt. This dry mix ensures the cocoa is evenly distributed and prevents clumps. Okay, ready for the game‑changer? Sift the dry ingredients into the wet mixture in two additions, folding gently with a spatula. Over‑mixing will develop gluten and make the cookies tough.
Kitchen Hack: Use a bench scraper to fold the dough; it reduces the chance of over‑mixing and keeps the batter airy. -
Once the dough comes together, fold in the dark chocolate chips and half of the cherry jam, reserving the rest for topping later. The jam should swirl through the batter, creating tiny ribbons of bright red. This visual cue tells you the jam is evenly distributed without turning the entire dough pink.
-
Cover the bowl with plastic wrap and place it in the refrigerator for 30 minutes. This chilling step firms up the butter, making the dough easier to handle and preventing excessive spreading during baking.
Watch Out: If you skip the chill, the cookies will spread too thin, losing that coveted soft‑center texture. -
Preheat your oven to 350°F (175°C) and line two baking sheets with parchment paper. Using a cookie scoop (about 1‑1½ tbsp), portion the dough onto the sheets, spacing them 2 inches apart. The dough balls should be smooth and about the size of a walnut.
-
Bake for 10‑12 minutes, or until the edges are set and the tops look matte but not browned. The centers will still look slightly undercooked—that’s the secret to a soft interior. This next part? Pure magic. While the cookies are still warm, press a small spoonful of the remaining cherry jam into the center of each cookie, creating a little well.
Kitchen Hack: Use a small silicone brush to spread the jam evenly; it prevents tearing the cookie surface. -
Now, for the final glaze: melt the remaining dark chocolate chips in a double boiler or microwave in 20‑second bursts, stirring until silky. Dip the top of each cookie into the melted chocolate, allowing excess to drip off. Place them back on the parchment and let the chocolate set at room temperature or pop them in the fridge for a quicker set.
-
While the chocolate hardens, whip the heavy cream with powdered sugar until soft peaks form. This takes about 2‑3 minutes on high speed. Once the chocolate is set, pipe or dollop a small mound of whipped cream onto each cookie, then finish with a light dusting of powdered sugar for that classic Black Forest finish.
That’s it — you did it. But hold on, I’ve got a few more tricks that'll take this to another level...
Insider Tricks for Flawless Results
The Temperature Rule Nobody Follows
Most home bakers bake at a single temperature, but the secret to a perfect Black Forest cookie lies in a two‑stage bake: start at 350°F for the initial set, then finish with a quick 5‑minute blast at 425°F for that glossy chocolate snap. This method creates a soft interior while giving the chocolate a crisp, crackly surface. I once tried skipping the high‑heat finish, and the glaze turned out dull and chewy—lesson learned.
Why Your Nose Knows Best
Don’t rely solely on a timer—trust your senses. When the edges start pulling away from the parchment and you catch a faint nutty aroma, the cookies are ready for the jam infusion. If you wait too long, the centers will dry out, and you’ll lose that coveted melt‑in‑your‑mouth feel. I’ve seen bakers pull the tray too early and end up with undercooked cookies; the smell is the true indicator.
The 5‑Minute Rest That Changes Everything
After the first bake, let the cookies rest on the sheet for exactly five minutes before adding jam and chocolate. This short rest allows steam to escape, preventing sogginess when the jam is added. Skipping this step results in a gummy center that never firms up, no matter how long you bake them.
Chocolate Tempering Simplified
If you want a professional‑grade snap, temper the chocolate using the seeding method: melt two‑thirds of the chips, then stir in the remaining third off the heat until it reaches 88°F (31°C). This gives the glaze a glossy shine and a firm snap that doesn’t melt on your fingers. It sounds intimidating, but a quick stir and a thermometer are all you need.
Whipped Cream Stability Hack
For whipped cream that holds its shape longer, add a pinch of cream of tartar or a splash of stabilizer powder before whipping. This prevents the cream from weeping after a few hours, especially if you’re serving the cookies at a party. I once forgot this and ended up with a watery topping—never again.
Creative Twists and Variations
This recipe is a playground. Here are some of my favorite ways to switch things up:
White Chocolate Cherry Delight
Swap the dark chocolate chips for white chocolate chips and add a teaspoon of almond extract to the dough. The milder chocolate lets the cherry jam shine even brighter, and the almond note adds a subtle nuttiness that pairs beautifully with the whipped cream.
Spicy Black Forest
Incorporate a pinch of cayenne pepper into the dry mix and drizzle a thin layer of dark chocolate mixed with a dash of chili oil over the finished cookies. The heat adds an unexpected kick that balances the sweetness, perfect for adventurous palates.
Nutty Crunch Variation
Fold in ½ cup toasted chopped hazelnuts or almonds with the chocolate chips. The nuts introduce a crunchy texture that contrasts the soft interior, and their buttery flavor complements the cherry jam beautifully.
Vegan Black Forest
Replace butter with coconut oil, use flax eggs (1 tbsp ground flaxseed + 3 tbsp water per egg), and swap heavy cream for coconut whipped cream. Use a plant‑based dark chocolate. The result is a dairy‑free version that still delivers that classic flavor profile.
Miniature Black Forest Bites
Form the dough into bite‑size balls (about ½ tablespoon each), bake on mini muffin tins, and top with a dollop of jam, a drizzle of chocolate, and a tiny swirl of whipped cream. These make perfect party appetizers or a cute dessert for kids.
Seasonal Berry Fusion
Replace half of the cherry jam with raspberry or blackberry preserves for a mixed‑berry twist. The tartness of the berries adds complexity, and the visual speckle of red and purple makes the cookies look even more enticing.
Storing and Bringing It Back to Life
Fridge Storage
Place the cooled cookies in an airtight container with a piece of parchment between layers. Store them in the refrigerator for up to 5 days. The chilled environment keeps the chocolate glossy and prevents the jam from soaking into the crumb.
Freezer Friendly
Wrap each cookie individually in plastic wrap, then seal them in a freezer‑safe zip‑lock bag. They’ll stay fresh for up to 3 months. When you’re ready to enjoy, let them thaw at room temperature for 15 minutes, then give them a quick 2‑minute bake at 300°F to revive the crisp edge.
Best Reheating Method
Before reheating, add a tiny splash (about 1 tsp) of water to the container and cover loosely with foil. Warm in a 300°F oven for 5‑7 minutes. The steam revives the soft interior while the foil protects the chocolate from melting, bringing the cookie back to its just‑baked glory.