I was in the middle of a frantic holiday prep when my roommate dared me to turn the leftover pecan pie crust into something that could actually survive a party. I stared at the half‑baked mess, the caramelized sugar clinging to the pan like a stubborn teenager to their phone, and thought, “What if I could roll this into bite‑size fireworks?” The kitchen was a symphony of clattering pans, the oven’s low hum, and the faint jingle of a distant snow globe. My nose caught a whiff of toasted nuts that reminded me of a warm fireplace, while the buttery crumbs whispered promises of sweet decadence.
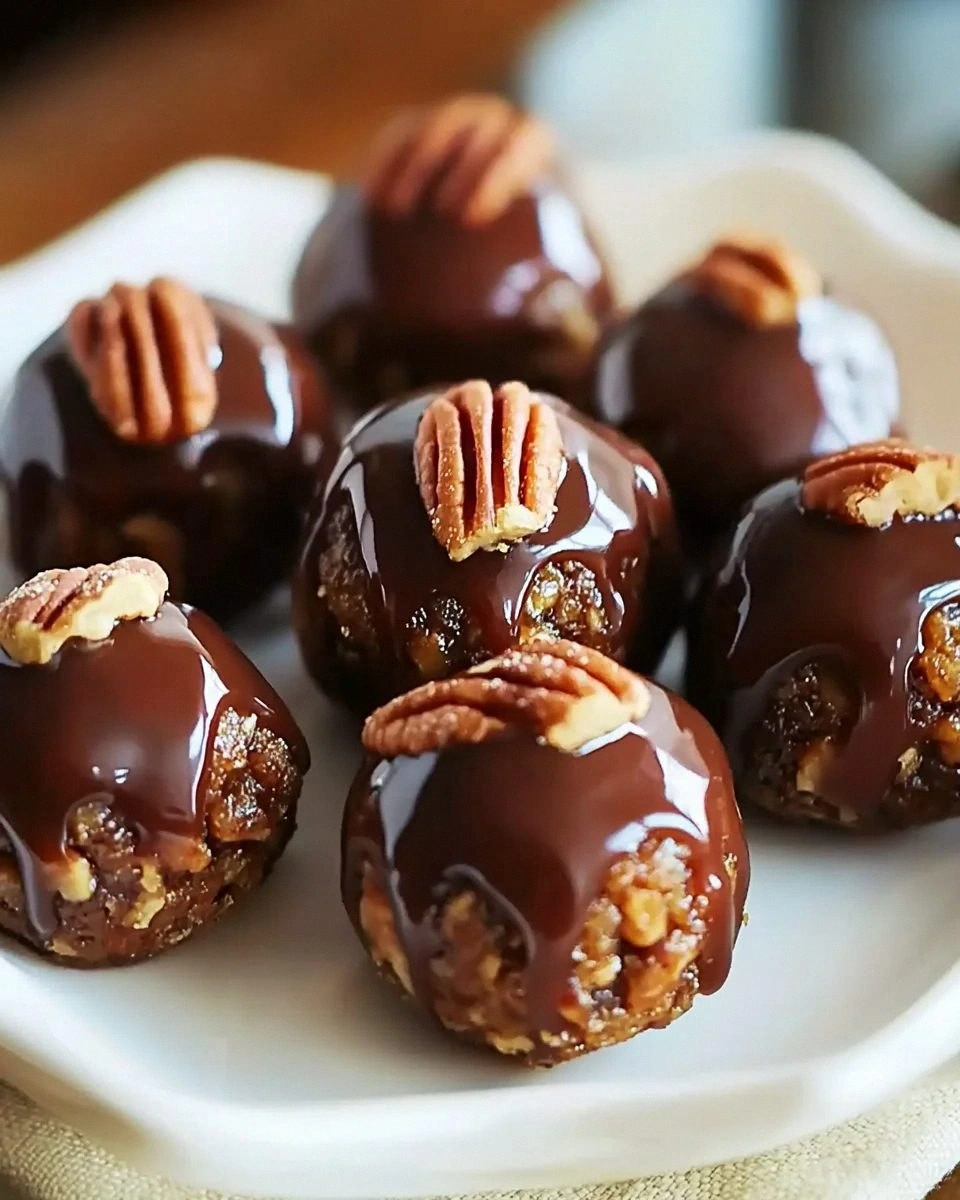
I tried a few half‑hearted attempts that turned out as flat as a forgotten New Year’s resolution. Most recipes I found either left the pecans soggy or the crust crumbly, and the vanilla flavor was either an afterthought or completely missing. I wanted something that would hit the palate with the richness of a classic pecan pie but with a handheld twist that screams “grab me now!” This version is the lovechild of a traditional pecan pie and a chocolate truffle, with a splash of bourbon that makes it feel like a holiday party in a bite.
What truly sets this recipe apart is the balance of textures: a crunchy exterior that cracks like fresh ice on a winter lake, a gooey interior that melts like snow on a warm mitten, and a buttery crumb that holds everything together. I’m not just talking about any vanilla; I’m talking about a vanilla extract that’s pure, fragrant, and bright enough to cut through the richness like a spotlight on a stage. And the best part? You only need a handful of pantry staples and a couple of minutes of your time to transform them into a show‑stopping treat.
I’m going to let you in on a secret ingredient that most people overlook: a splash of bourbon (or apple juice for the non‑alcoholic crowd). It adds a depth that makes the sugar caramelize just right, and the aroma is so intoxicating you’ll swear the kitchen turned into a speakeasy. Okay, ready for the game‑changer? Let me walk you through every single step — by the end, you’ll wonder how you ever made it any other way.
What Makes This Version Stand Out
- Taste: The combination of brown sugar, maple syrup, and bourbon creates a caramel‑rich flavor that’s deep, yet balanced by the bright vanilla.
- Texture: A crisp, buttery crust gives way to a chewy, nutty center, while chocolate chips add a silky surprise.
- Simplicity: No fancy equipment—just a bowl, a baking sheet, and your favorite mixing spoon.
- Uniqueness: The bourbon‑infused glaze is a twist most recipes miss, turning ordinary pecan balls into a festive masterpiece.
- Crowd Reaction: I dare you to taste this and not go back for seconds; it’s a guaranteed “wow” at any gathering.
- Ingredient Quality: Using fresh, unsalted pecans and high‑quality vanilla makes the difference between good and unforgettable.
- Cooking Method: A quick bake at a high temperature locks in flavor while keeping the interior soft.
- Make‑Ahead Potential: These balls store beautifully, so you can prep them ahead of the holiday rush and bake them fresh.
Inside the Ingredient List
The Flavor Base
The brown sugar is the heart of this recipe, providing that deep caramel note that mimics a classic pecan pie filling. If you substitute with white sugar, you’ll lose the richness and end up with a flat flavor profile. For a deeper molasses feel, you can swap half of the brown sugar with dark muscovado, but be careful—it’s potent, so you might need to reduce the maple syrup slightly. The vanilla extract is the bright spark that lifts the entire mixture; use pure extract, not imitation, because the difference is like night versus day in the final aroma.
A dash of salt (just ½ teaspoon) is essential; it acts like a conductor, amplifying the sweet notes and preventing the mixture from tasting cloyingly sweet. If you’re on a low‑sodium diet, you can cut the salt in half, but you’ll notice a subtle loss of depth. The maple syrup adds a woody sweetness and helps bind the crumbs together, creating that perfect sticky texture that holds the ball shape without crumbling.
The Texture Crew
Pecans are the star here—crunchy, buttery, and slightly bitter, they provide the signature crunch that makes each bite exciting. Choose raw, unsalted pecans and toast them lightly for extra depth; the aroma will fill your kitchen like a holiday market. If you can’t find fresh pecans, frozen ones work just as well—just let them thaw completely before using.
Graham cracker crumbs act as the structural backbone, absorbing moisture from the syrup and sugar while keeping the mixture light. You can blitz whole crackers in a food processor for a finer texture, but I prefer a slightly coarse crumb for that satisfying bite. The chocolate chips melt into pockets of molten goodness, turning each ball into a surprise center that’s as delightful as finding an extra present under the tree.
The Unexpected Star
A splash of bourbon (or apple juice for a non‑alcoholic version) is the secret weapon that elevates this recipe from ordinary to extraordinary. The alcohol evaporates during baking, leaving behind a caramel‑like depth that whispers of holiday cheer. If you’re avoiding alcohol, a robust apple juice works surprisingly well, adding a fruity undertone that complements the maple.
The Final Flourish
A final drizzle of maple syrup right before baking creates a glossy finish that looks as good as it tastes. This glaze caramelizes slightly, giving the balls a subtle crunch on the outside while keeping the interior soft. Sprinkle a pinch of flaky sea salt on top after baking for a sophisticated sweet‑and‑salty contrast that will have guests reaching for more.
Everything's prepped? Good. Let's get into the real action...
The Method — Step by Step
-
Preheat your oven to 350°F (175°C). While the oven warms up, line a baking sheet with parchment paper—this prevents sticking and makes cleanup a breeze. I like to set a timer for 5 minutes just to keep track; the anticipation builds like waiting for the first snowflake.
Kitchen Hack: If you’re short on parchment, lightly grease the sheet with butter; it adds extra flavor. -
Toast the pecans in a dry skillet over medium heat for 4‑5 minutes, stirring constantly until they’re fragrant and lightly browned. The scent will fill your kitchen like a holiday market, and you’ll hear a gentle sizzle that tells you they’re perfect. Once toasted, let them cool for a minute, then roughly chop them—no need for a food processor; a coarse chop gives you that delightful bite.
-
In a large mixing bowl, combine the graham cracker crumbs, brown sugar, salt, and maple syrup. Stir until the mixture looks like damp sand, with the syrup coating every crumb. This is the moment of truth: the texture should be sticky enough to hold together when pressed, but not soggy.
Watch Out: Adding too much maple syrup will make the mixture overly wet, leading to flat balls that spread during baking. -
Add the toasted pecans, bourbon (or apple juice), and vanilla extract to the bowl. Mix vigorously with a spatula until everything is evenly distributed. You’ll notice the mixture becomes glossy and begins to clump—this is exactly what you want.
-
Fold in the chocolate chips gently, ensuring they stay whole. The chips should be evenly speckled throughout the mixture, like hidden treasures waiting to be discovered in each bite.
-
Cover the bowl with plastic wrap and chill in the refrigerator for 15‑20 minutes. This step is crucial; the cooler mixture is easier to roll and holds its shape better. I always set a timer because patience is a virtue, especially when you can already smell that sweet aroma.
Kitchen Hack: If you’re in a hurry, pop the bowl in the freezer for 8 minutes instead of the fridge. -
Using a tablespoon or a small ice‑cream scoop, portion out the chilled mixture and roll each piece between your palms into a smooth ball about 1‑inch in diameter. The texture should feel tacky but not sticky; if it sticks, dust your hands lightly with powdered sugar.
Place the balls onto the prepared baking sheet, leaving a small gap between each. This spacing allows the heat to circulate, giving each ball a uniform crust.
-
Bake for 12‑15 minutes, or until the tops turn a golden amber and you see the edges start to pull away from the parchment. The scent at this point is intoxicating—a blend of caramel, toasted nuts, and vanilla that makes you want to dance around the kitchen.
When the timer dings, remove the sheet and let the balls cool on the pan for 5 minutes before transferring them to a wire rack. This brief rest lets the interior set, ensuring they don’t fall apart when you pick them up.
-
While the balls are still warm, drizzle a thin stream of maple syrup over each and sprinkle a pinch of flaky sea salt if desired. The glaze will harden slightly, giving a glossy finish that looks as festive as a string of holiday lights.
Serve them warm, or store in an airtight container for up to a week. Trust me, the first bite will make you proclaim, “This is hands down the best version you’ll ever make at home.”
That's it — you did it. But hold on, I've got a few more tricks that'll take this to another level...
Insider Tricks for Flawless Results
The Temperature Rule Nobody Follows
Never bake these balls at a temperature lower than 350°F. A lower heat will cause them to dry out before the crust gets that beautiful caramelization. The high heat creates a quick seal on the outside, locking in moisture for a chewy interior. I once tried 325°F and ended up with pale, soggy spheres that looked like they belonged in a science lab, not a holiday spread.
Why Your Nose Knows Best
Your sense of smell is the ultimate timer. When the aroma shifts from nutty to caramel‑rich with a hint of vanilla, you know the balls are almost ready. Trust that nose cue more than the clock; it’s like having a built‑in culinary GPS.
The 5‑Minute Rest That Changes Everything
After baking, let the balls rest for exactly five minutes before adding the glaze. This pause lets the interior settle, preventing the glaze from soaking in and making the balls soggy. A friend once skipped this step and ended up with a sticky mess that clumped together—lesson learned!
Chill Before You Roll
Chilling the mixture is non‑negotiable. It firms up the butter and sugar, making the dough easier to handle. If you’re in a rush, a quick 8‑minute freeze works just as well, but don’t skip the cooling entirely.
Double‑Dip for Extra Crunch
For a double crunch, roll the chilled balls in a mixture of finely ground pecans and a touch of brown sugar before baking. This creates a crust that shatters like thin ice, adding an extra layer of texture that will have guests reaching for more.
Seasonal Swaps Keep It Fresh
If you’re making these in the summer, swap the bourbon for a splash of orange liqueur and add a pinch of orange zest. The citrus brightens the flavor profile and makes the treat feel season‑appropriate without losing the core decadence.
Creative Twists and Variations
This recipe is a playground. Here are some of my favorite ways to switch things up:
Cranberry Burst
Fold in ¼ cup dried cranberries and a teaspoon of orange zest. The tartness cuts through the sweetness, giving each bite a festive pop that’s perfect for a holiday charcuterie board.
Spiced Chai
Add a teaspoon of chai spice blend (cinnamon, cardamom, ginger, cloves) to the dry ingredients. The warm spices echo the holiday spirit and pair beautifully with the bourbon.
White Chocolate & Peppermint
Swap the dark chocolate chips for white chocolate and sprinkle crushed peppermint candies on top after baking. It’s a holiday classic that turns these balls into miniature candy canes.
Nut‑Free Delight
Replace pecans with toasted pumpkin seeds and use oat‑based graham cracker crumbs. The flavor shifts to a more earthy profile, and it’s safe for anyone with nut allergies.
Salted Caramel Drizzle
Instead of maple syrup, drizzle a homemade salted caramel sauce after baking and finish with flaky sea salt. The sweet‑and‑salty combo is decadently addictive.
Coffee Infusion
Add a tablespoon of strong brewed espresso to the wet mixture and swap half the bourbon for coffee liqueur. The coffee notes deepen the flavor, making these balls a perfect after‑dinner treat.
Storing and Bringing It Back to Life
Fridge Storage
Place the cooled balls in an airtight container lined with parchment paper. They’ll stay fresh for up to 5 days. If you notice any condensation, pat the tops with a paper towel before resealing.
Freezer Friendly
These beauties freeze like a charm. Arrange them on a baking sheet in a single layer, freeze for 2 hours, then transfer to a zip‑top freezer bag. They’ll keep for up to 3 months. When you’re ready to serve, let them thaw at room temperature for 20 minutes, then give them a quick 5‑minute bake at 350°F to revive the crust.
Best Reheating Method
Reheat in a preheated oven at 300°F for 8‑10 minutes. Add a tiny splash of water to the pan (just a teaspoon) before reheating; the steam will bring back that melt‑in‑your‑mouth softness without drying them out.