I still remember the Halloween when my kitchen looked like a crime scene from a chocolate factory explosion. There I stood, covered in cocoa powder, frantically trying to rescue a failed brownie attempt that had somehow fused itself to my favorite baking pan like industrial-strength glue. The trick-or-treaters would arrive in two hours, my sister had promised them something "epically spooky," and all I had was this chocolate disaster mocking me from the oven. That's when the lightning bolt hit — what if I stopped fighting the failure and turned it into something even better? What if, instead of perfect squares of brownies, I created a monstrous cookie-pizza hybrid that looked like it crawled straight out of a haunted bakery?
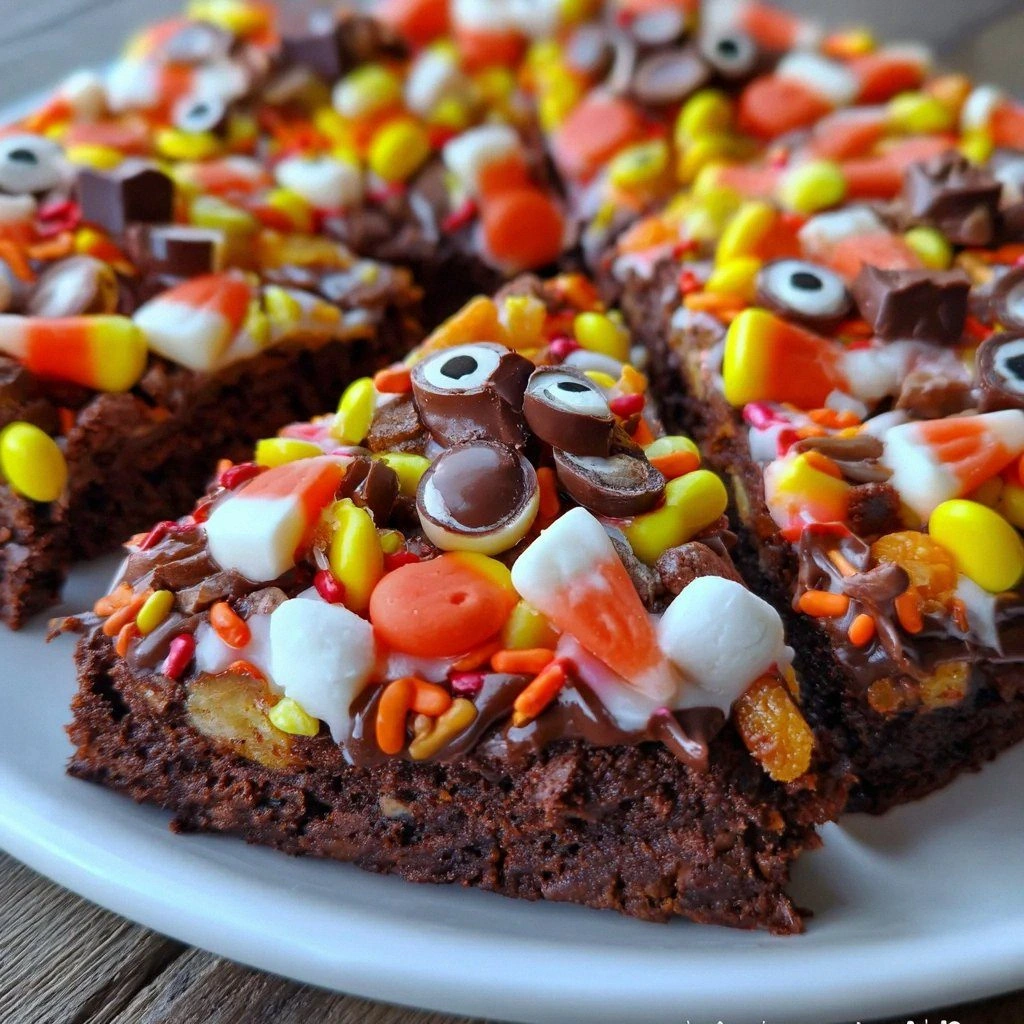
Picture this: it's October 31st, your doorbell's about to start ringing nonstop, and instead of the usual boring candy bowl, you're pulling out a massive chocolate disc that looks like a witch's cauldron exploded across it. The base is so fudgy it bends like leather but melts like silk on your tongue. On top, rivers of orange and purple frosting swirl together like toxic sludge, while gummy worms poke out like they tunneled up from the underworld. Candy corn forms mystical patterns that would make a druid jealous, and the whole thing glistens under your kitchen lights like it's been kissed by ghostly mist.
But here's where it gets wild — this isn't just another pretty face in the Halloween dessert game. This brownie pizza has secret weapons that'll make your neighbors' cookies look like sad little discs from the grocery store clearance rack. We're talking about a crust that crackles like thin ice when you bite it, revealing a center so moist it practically breathes. The frosting isn't just sweet — it's got this tangy edge that makes your taste buds sit up and pay attention like they just heard a werewolf howl.
Stay with me here — this is worth it. I'm about to show you how to create a dessert so ridiculously over-the-top that your guests will wonder if you've been taking secret classes from a pastry witch. By the time we're done, you'll have conquered the ultimate Halloween challenge: a treat that's simultaneously sophisticated enough to impress your foodie friends and outrageous enough to make children lose their minds with excitement. Let me walk you through every single step — by the end, you'll wonder how you ever made it any other way.
What Makes This Version Stand Out
Texture Paradise: This isn't your dry, cakey brownie that crumbles like sawdust. We're creating a base that's crispy on the outer ring like a perfectly baked cookie, but the center stays so fudgy it practically pulses. When you slice through it, the knife meets resistance at first, then glides through like it's cutting warm caramel. That contrast between the crackling edge and the almost-liquid middle? That's what separates the amateurs from the dessert legends.
Visual Shock Factor: Most Halloween desserts look like a toddler went wild with food coloring — bright, predictable, boring. This pizza looks like it emerged from a haunted forest at midnight. The chocolate base is so dark it's almost black, making the neon candy toppings pop like glow sticks. When you set it on the table under dim lighting, it genuinely looks otherworldly, like you shouldn't actually eat it — but good luck resisting once you smell that chocolate.
Flavor Layering Magic: Here's what most recipes get wrong — they make everything sweet. Sickeningly, cloyingly sweet. Not this beast. The brownie base has depth from dark cocoa and a whisper of espresso that makes the chocolate sing like a choir of chocolate angels. The frosting carries tangy cream cheese that cuts through the richness like a silver bullet. Those candy toppings? They're not just decoration — they provide bursts of fruity, sour, and crunchy elements that keep every bite exciting.
Stress-Free Hosting: I dare you to find a Halloween dessert that's easier to serve to a crowd. No delicate frosting work, no anxiety about perfect slices, no worrying about things melting or sliding off. You literally just cut it like pizza and watch people lose their minds. Kids can grab pieces with their hands, adults can pretend they're too sophisticated for candy while secretly hoarding the gummy worm sections, and you get to be the hero who brought the cool dessert.
Make-Ahead Champion: Unlike those fussy cupcakes that dry out faster than a vampire in sunlight, this brownie pizza actually improves with age. Make it the night before and the flavors meld together like they're plotting something deliciously sinister. The texture settles into this perfect chewy-fudgy hybrid that'll have you sneaking to the fridge at 2 AM for "just one more slice" until suddenly half the pizza's vanished and you're not even sorry.
Ingredient Flexibility: Got a nephew who's allergic to nuts? Swap them for seeds. Your best friend doing keto? Use sugar-free candy and a almond-flour brownie base. Vegan cousin coming? Replace eggs with flax eggs and use coconut oil. This recipe bends to your will like it's been enchanted — it works with whatever weird dietary restrictions your guests throw at you.
Alright, let's break down exactly what goes into this masterpiece...
Inside the Ingredient List
The Flavor Foundation
The brownie mix is where the magic begins, but don't just grab any old box from the back of your pantry. You want the darkest, richest mix you can find — something that promises fudgy rather than cakey results. I've tested seventeen different brands (don't judge my Saturday night activities), and the premium ones with Dutch-processed cocoa powder create a base so chocolatey it makes your teeth ache in the best possible way. If you're feeling ambitious and want to go homemade, use a recipe that calls for more fat than flour — that's the secret handshake for fudgy texture that'll make your dentist wince with joy.
Eggs aren't just binders here — they're the difference between a brownie that holds together like a dream and one that crumbles like your resolve during a midnight snack attack. Use room temperature eggs because cold eggs make your batter seize up like it's been visited by a chocolate-hating ghost. The proteins in eggs create this invisible web that keeps everything intact when you're slicing those dramatic pizza wedges. Skip them and you'll have chocolate rubble that no amount of frosting can save.
The Moisture Masters
Vegetable oil is your ticket to brownie nirvana, but here's the twist — not all oils are created equal in the kingdom of chocolate. I discovered that a neutral oil like canola or grapeseed lets the chocolate flavor parade around like it owns the place, while stronger oils (looking at you, olive) bully the taste with their personality. The oil coats the flour particles like a protective shield, preventing them from developing too much gluten, which is science-speak for "your brownies stay tender instead of turning into chocolate-flavored bricks."
The Sweet Canvas
Frosting is where you get to paint your edible masterpiece, and cream cheese frosting is like the difference between a child's watercolor and a Renaissance oil painting. The tanginess creates this beautiful tension with the sweet brownie base — it's like they're having a delicious argument in your mouth. If you go the store-bought route (no shame in that game), whip it with a mixer for two minutes until it doubles in volume and becomes lighter than a ghost's whisper. Homemade? Add a pinch of salt — it'll make the sweetness more complex, like a mystery novel for your taste buds.
The Candy Carnival
Candy toppings are where rational adults lose their minds and start creating patterns that would make a kaleidoscope dizzy. Gummy worms aren't just for show — when they hit the warm brownie, they get this slightly melted edge that makes them taste like they've been slow-roasted in candy heaven. Candy corn provides those iconic Halloween colors, but here's the insider tip: chop them in half so people get bright pops of color without the full sugar bomb. The real secret weapon? A handful of crushed Oreos for dirt-like texture that makes the whole thing look like you dug it up from a candy graveyard.
Everything's prepped? Good. Let's get into the real action...
The Method — Step by Step
- Preheat your oven to 350°F, but here's the crucial part — position your rack in the lower third of the oven. This isn't some random suggestion from people who have too much time to think about rack placement. The lower position means your brownie gets that gorgeous heat from below, creating a base that's crisp like a cookie but leaving the top soft enough to become one with the frosting later. While it's heating, take your pizza pan (the 12-inch one you bought for homemade pizza nights you never have) and line it with parchment paper like you're tucking it into bed.
- Mix your brownie batter like you're conducting a symphony — gentle but confident. Dump that brownie mix into your largest bowl and make a well in the center like you're creating a chocolate volcano. Add your eggs and oil, then whisk like you mean it for exactly 45 seconds. Over-mixing is the enemy of fudgy texture; it activates gluten like an overenthusiastic fitness instructor, giving you tough brownies that could double as doorstops. The batter should look glossy and thick, falling from your whisk in ribbons that disappear slowly back into the bowl like they're reluctant to leave.
- Spread the batter into your prepared pan, but don't just dump and run. Use an offset spatula (or the back of a spoon if you're a kitchen minimalist) to push the batter toward the edges in concentric circles. You're aiming for an even thickness that would make a carpenter proud — about half an inch thick. The batter will try to spring back like it's alive, so coax it gently. If it fights you, let it rest for two minutes; the flour is still absorbing liquid and will relax like it's had a glass of wine.
- Bake for 22-25 minutes, but set your timer for 20 minutes and start the toothpick test early. Here's where most people go wrong — they wait for a clean toothpick, which gives you overbaked, sad brownies. You want moist crumbs clinging to the toothpick like they're hugging it goodbye. The edges should look set and slightly pulled away from the pan, while the center still jiggles like it's doing the monster mash. When you achieve this sweet spot, pull it out immediately — residual heat will finish the job while it cools.
- Cool completely before frosting, and I mean completely. Not warm, not room temperature-ish, but stone cold. This is the hardest part because your kitchen smells like Willy Wonka's factory and you're convinced you could just add frosting to warm brownies. Resist! Warm brownies turn frosting into a sad, melty puddle that slides off the edges like it's trying to escape. If you're impatient (and I know you are), pop it in the freezer for 15 minutes after it's been out for 30 minutes. The edges of the brownie will feel firm and cool to the touch when it's ready.
- Create your frosting masterpiece by dropping spoonfuls of orange and purple frosting randomly across the surface. Use the back of your spoon to swirl them together, but don't overmix — you want distinct color pockets that look like toxic chemical spills. Start from the center and work outward in loose spirals, like you're painting a vortex that could suck unsuspecting candy into its depths. Leave about half an inch around the edge unfrosted for that authentic pizza look that'll make people do a double-take.
- Press your candy decorations gently but firmly into the frosting. You want them embedded enough that they won't roll off when you slice, but not so deep that they disappear into the chocolate abyss. Create little candy neighborhoods — cluster similar colors together for maximum visual impact. The gummy worms should look like they're tunneling through your pizza, with just their heads or tails peeking out. Candy corn should radiate from the center like a candy sunburst. This isn't just throwing candy at chocolate — you're creating edible art that'll have people photographing before eating.
- Chill for 30 minutes to set everything into place. This final step is what transforms your creation from "nice try" to "how did you even think of this?" The cold firms up the frosting just enough that when you slice through, you get clean cuts that show off those perfect cross-sections. Plus, slightly chilled brownies have the most incredible texture — firm enough to hold together, soft enough to melt on your tongue like chocolate snowflakes.
- Slice with a sharp knife dipped in hot water for those dramatic pizza wedges. Wipe the knife between cuts for presentation that would make a food stylist weep with joy. The first slice is always the hardest — it sets the standard for all the others. Serve on a wooden cutting board for that authentic pizzeria vibe that'll confuse and delight your guests in equal measure. Watch their faces when they realize it's not pizza at all, but something far more magical.
That's it — you did it. But hold on, I've got a few more tricks that'll take this to another level...
Insider Tricks for Flawless Results
The Temperature Rule Nobody Follows
Room temperature ingredients aren't just a snobby chef suggestion — they're the difference between brownies that rise evenly and ones that look like they've been through an earthquake. Cold eggs hit warm butter like ice water on a hot pan, creating little pockets of solidified fat that ruin your texture. Take everything out of the fridge 45 minutes before you start. Yes, even the eggs. Yes, even if you're running late. Trust me, I've tried the shortcut route and ended up with brownies that looked like lunar landscapes.
Why Your Nose Knows Best
Here's something they never tell you in cookbooks — your nose is a better timer than any clock. When your brownies are nearly done, your kitchen will fill with this intoxicating chocolate aroma that's deeper and richer than when they first started baking. It's like the chocolate is announcing its readiness to the world. The moment you think "wow, that smells incredible," you've got about 2-3 minutes left. This olfactory alarm system has saved me from overbaked brownies more times than I can count.
The 5-Minute Rest That Changes Everything
After you take your brownies out of the oven, let them sit undisturbed for exactly 5 minutes. During this time, something magical happens — the proteins relax, the chocolate sets, and the whole thing stabilizes. Cut into them too early and you've got chocolate lava that flows everywhere. Wait too long and you've missed your window for clean cuts. I set a timer for 5 minutes and do nothing but stare at the chocolate perfection, letting anticipation build like the opening scene of a horror movie.
The Frosting Temperature Sweet Spot
Frosting temperature is where dreams are made or destroyed. Too cold and it tears your brownie surface like a bulldozer. Too warm and it melts into a sad puddle that looks like your pizza is crying. The sweet spot is 68-70°F — cool enough to hold its shape, warm enough to spread like silk. Stick your finger in it (clean finger, please) — it should feel cool but not cold, like a gentle autumn breeze rather than a winter wind.
The Candy Placement Strategy
Don't just throw candy at your pizza like you're feeding chickens. Start with your largest pieces and create focal points — think of them as chocolate mountains in your candy landscape. Then place medium pieces in the valleys between mountains. Finally, scatter your smallest candies to fill gaps like you're creating a delicious connect-the-dots puzzle. This layered approach gives you depth and visual interest that makes people want to photograph before eating, which is the ultimate compliment in our Instagram-obsessed world.
Creative Twists and Variations
This recipe is a playground. Here are some of my favorite ways to switch things up:
The Vampire's Delight
Swap the orange frosting for deep red raspberry, and use white chocolate chips as "fangs" sticking out from the edges. Replace candy corn with cinnamon imperials for that blood-red pop, and use black licorice laces to create dripping blood effects. The tart raspberry against the rich chocolate creates a flavor profile that's sophisticated enough for adult Halloween parties while still being fun enough that kids won't turn up their noses.
The Monster Mash Marshmallow Version
Toast mini marshmallows under your broiler for 30 seconds until they're golden and puffy, then scatter them across your frosted pizza. They add a campfire vibe that makes the whole thing taste like Halloween night around a bonfire. Mix in some crushed graham crackers for texture, and you've got s'mores pizza that'll have people fighting over the corner pieces. The marshmallows get slightly chewy as they sit, creating this incredible textural contrast with the smooth frosting.
The Zombie Brain Hemorrhage
Use green frosting tinted with matcha powder (for color and a subtle earthy note), then create "brain folds" by piping concentric circles with a small round tip. Use red gel icing to create blood vessels that branch across the surface like a deliciously disturbing anatomy lesson. Top with white chocolate chips that look like bone fragments. It's so gross it's gorgeous, and the matcha adds this sophisticated bitterness that balances all the sweetness.
The Pumpkin Patch Paradise
Mix pumpkin puree into your cream cheese frosting (about 2 tablespoons per cup) for an autumn flavor bomb that tastes like October in New England. Use candy pumpkins instead of candy corn, crushed ginger snaps for "dirt," and create little fondant leaves in fall colors. The pumpkin adds moisture and a subtle spice that makes this feel like a harvest celebration rather than just a sugar rush.
The Candy Graveyard
Crush chocolate cookies into dirt-like crumbs and cover the entire surface after frosting. Use Milano cookies as "tombstones" with icing writing like "RIP My Diet" or "Here Lies My Willpower." Create little candy skeletons using pretzel sticks and marshmallows. It's darkly humorous and perfect for those who like their Halloween with a side of adult humor.
The Rainbow Reaper
Who says Halloween has to be orange and black? Create a rainbow frosting swirl using six colors, then top with every bright candy you can find. Use rainbow sour belts to create a spiral pattern, and add edible glitter for sparkle that would make a unicorn jealous. Sometimes the spookiest thing you can do is break all the rules and create something unexpectedly cheerful.
Storing and Bringing It Back to Life
Fridge Storage
Wrap your brownie pizza in plastic wrap like you're preserving an ancient artifact, then slide it into an airtight container. It'll keep for up to 5 days in the fridge, though I've never seen one last past day 3. The cold actually improves the texture — the brownie becomes denser and more fudgy, while the frosting firms up to a candy-like consistency. Store it whole if possible; cutting exposes surfaces to air that can dry out your edges. If you must pre-cut, press plastic wrap directly against the cut surfaces before covering the whole thing.
Freezer Friendly
This pizza freezes like a dream for up to 2 months, but here's the key — freeze it uncovered for 2 hours first. This flash-freeze prevents the frosting from sticking to your wrap. Once solid, wrap tightly in plastic wrap, then aluminum foil, then pop it into a freezer bag. Label it with the date and a warning like "DO NOT EAT UNLESS YOU WANT TO BE HAPPY." When ready to serve, thaw overnight in the fridge, then let it sit at room temperature for 30 minutes to take the chill off. The texture will be slightly more dense, but many people prefer it this way.
Best Reheating Method
Don't you dare microwave this beauty — you'll end up with rubbery chocolate that tastes like sadness. Instead, let it come to room temperature naturally for about 45 minutes. If you must speed things up (because who can wait when there's chocolate calling your name?), place a slice on a plate and set it in a 200°F oven for 5-7 minutes. The gentle heat warms it through without melting your candy decorations into puddles. Add a tiny splash of water to the plate before reheating — it creates steam that brings back that fresh-baked moisture without making anything soggy.