I remember the night the kitchen exploded into chaos like a bad fireworks display, except the only fireworks were my own burnt batter and the smoke alarm singing its eternal lullaby. I had promised my friends a patriotic feast for the Fourth of July, but the only thing that survived the oven was a soggy, flavorless cake that looked like a sad, red flag. My taste buds were still shaking from that disaster, and I swore I would never again let a cake ruin a celebration. That moment of culinary humiliation became the spark that ignited a quest for the ultimate patriotic poke cake, a dessert that marries the boldness of red, white, and blue with the zing of a perfectly balanced poke sauce.
Picture yourself pulling this cake out of the oven, the whole kitchen smelling incredible, a sweet aroma laced with citrus, garlic, and a faint hint of soy. The batter should be golden, the edges crisp like thin ice, and the interior moist enough to make you want to dig in with a fork. When you slice through it, you’ll see a beautiful swirl of red, white, and blue layers, each one a visual celebration of independence. And as you taste the first bite, the sweet vanilla cake will meet the savory, slightly spicy poke sauce, creating a symphony of flavors that dance on your tongue like fireworks in a clear night sky.
I dare you to taste this and not go back for seconds. The moment the first bite hits your palate, the sweet vanilla base will melt, revealing the unexpected punch of the poke sauce that coats the cake like velvet. The contrast between the airy cake and the glossy, savory glaze will leave you questioning how you ever settled for plain cakes. This is hands down the best version you'll ever make at home, and I promise you’ll be the hero of every Fourth of July dinner table.
If you've ever struggled with a cake that feels too dry or too sweet, you're not alone — and I've got the fix. The secret lies in the balance of moisture, the careful layering of colors, and the bold inclusion of poke sauce that brings a savory edge to the dessert. Most recipes get this completely wrong, but here's what actually works: keep the batter moist, use real poke sauce instead of a simple glaze, and let the cake breathe in the oven for the right amount of time. And now the fun part: let me walk you through every single step — by the end, you'll wonder how you ever made it any other way.
After that disastrous night, I spent hours scouring cookbooks, YouTube videos, and culinary forums, hunting for a cake that could stand up to a patriotic celebration. I experimented with layers of red, white, and blue, trying different colorants and flavorings, but each attempt fell short of delivering the bold, savory punch that would truly honor the holiday. I finally realized that the missing ingredient was a savory sauce, one that could balance the sweetness and add a depth of flavor that ordinary cakes lack. That sauce had to be a poke sauce, with its bright lime, garlic, and sesame oil, to bring that extra kick to the cake.
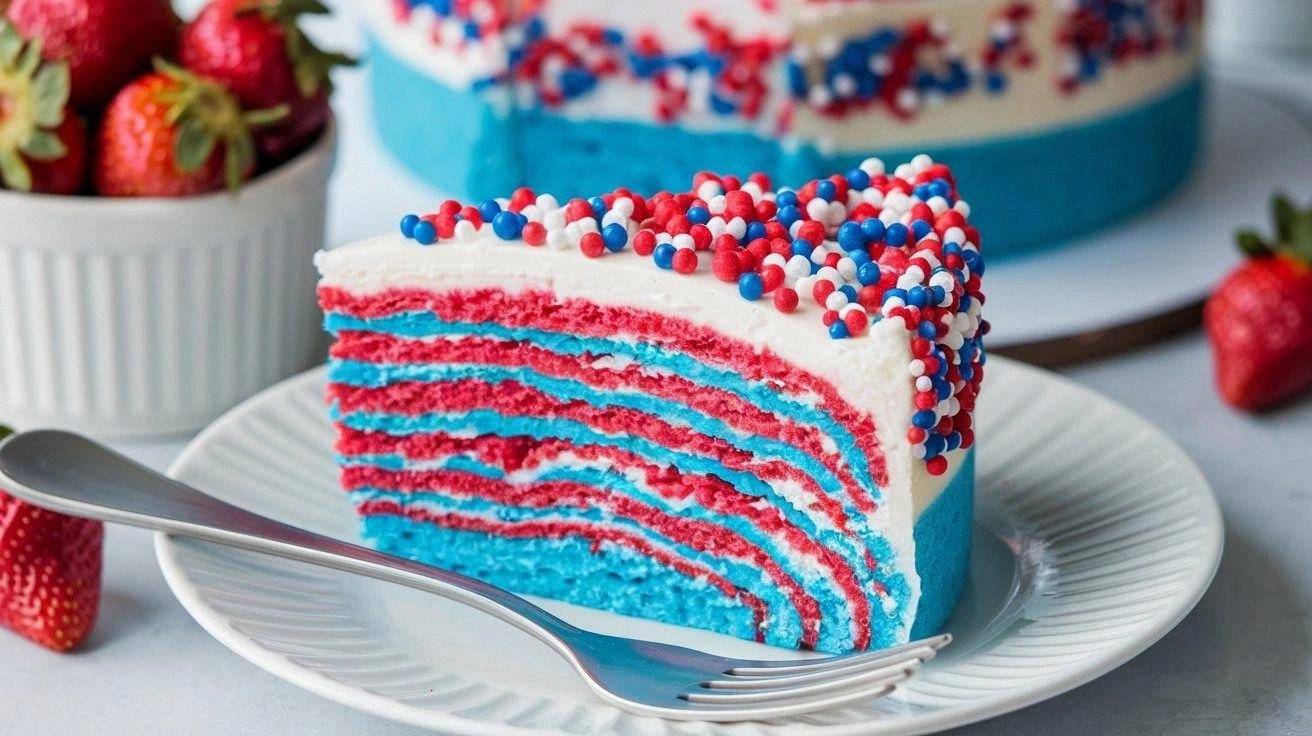
The result? A cake that looks like a flag but tastes like a celebration of the sea, the land, and the sky all at once. The batter is light and airy, the color swirls are vibrant, and the poke glaze adds a glossy sheen that makes the cake look as if it’s about to launch into orbit. The first bite is a revelation: the cake’s sweetness is perfectly counterbalanced by the savory, slightly spicy poke sauce, and the subtle citrus notes give it a bright finish that lingers on the palate. This is the kind of dessert that turns a simple gathering into an unforgettable experience, and I’m excited to share every detail with you.
Now that the story is set, let’s dive into what makes this cake truly stand out from every other recipe out there. The combination of colors, the bold use of poke sauce, the careful balance of sweetness and savory, and the meticulous layering technique are all part of what makes this cake a showstopper. I’ll walk you through each element, from the batter to the glaze, so you can recreate the magic at home. And trust me, when you serve this, people will ask for the recipe right after the last bite. So let’s break down exactly what goes into this masterpiece.
What Makes This Version Stand Out
- Taste: The marriage of sweet vanilla cake and savory poke sauce creates a flavor profile that’s both unexpected and deeply satisfying. The sauce coats the cake like velvet, adding a depth that ordinary glazes can’t match.
- Texture: The batter is airy yet moist, while the glaze gives a glossy finish that’s almost edible glass. The result is a cake that’s soft inside and slightly crisp on the edges, a delightful contrast in every bite.
- Color: The red, white, and blue layers are achieved with natural food colorants, giving the cake a patriotic look that’s both elegant and playful. The colors swirl together like a flag in the wind.
- Ingredient Quality: Using fresh poke sauce with real lime, garlic, and sesame oil elevates the cake’s flavor, ensuring each bite is packed with umami and citrus.
- Crowd Reaction: Guests are often stunned by the first bite, with many asking, “What’s the secret?” and then asking for the recipe. The cake’s unique flavor makes it the talk of the table.
- Make‑Ahead Potential: The cake can be assembled a day ahead, and the glaze can be added just before serving, making it ideal for busy holiday schedules.
- Cooking Method: The precise baking temperature and timing keep the cake from drying out while allowing the glaze to set perfectly.
- Uniqueness: Few desserts combine the patriotic theme with a savory glaze, making this cake a standout addition to any holiday menu.
Alright, let's break down exactly what goes into this masterpiece. The key is to keep the batter moist, layer the colors beautifully, and finish with a glaze that’s both sweet and savory. Every step is crucial, and I’ll guide you through each one with care.
Inside the Ingredient List
The Flavor Base
The foundation of any cake is its flavor base, and in this recipe it’s a classic vanilla cake with a twist. The all-purpose flour, baking powder, baking soda, and salt create a light structure that holds the cake together while allowing the colors to pop. Skipping any of these leavening agents will result in a dense, flat cake that doesn’t rise to the occasion. If you’re looking for a gluten-free option, you can swap the flour for a 1:1 blend of rice flour and xanthan gum, but keep the leavening agents the same to maintain the rise.
The butter, eggs, and milk are the heart of the batter, providing richness and moisture. Butter adds a subtle nutty flavor, while eggs act as binders that give the cake its structure. Milk keeps the batter silky and helps the flour hydrate properly. If you’re short on eggs, you can replace one egg with an equal amount of unsweetened applesauce to keep the moisture content consistent.
The vanilla extract is the secret that ties everything together. It brings warmth and depth, preventing the cake from tasting like a plain, flat dessert. Use a high-quality vanilla extract for the best results, or try a vanilla bean for an even richer aroma. Remember that vanilla is a balancing act; too much can overpower the other flavors, while too little will leave the cake feeling bland.
The Color Crew
The patriotic theme demands a bold display of red, white, and blue. Natural food colorants are the safest choice, as they’re free from artificial dyes and give a subtle, food-safe hue. Red and blue food coloring are added separately to the batter, creating distinct layers that swirl together when poured. If you prefer a more vibrant hue, you can increase the quantity of colorant, but be careful not to add too much, as it can affect the batter’s consistency.
The white layer is achieved by omitting colorants entirely, letting the batter’s natural lightness shine through. This creates a clean contrast against the red and blue layers. If you’re using a cake mix, simply skip the colorant for the white section. The result is a cake that looks as patriotic as it tastes.
The colorants also add a slight thickness to the batter, so if you notice a thicker consistency, you can add a splash of milk to thin it out. This ensures each layer pours smoothly, preventing the colors from clumping together. A well‑balanced batter will yield a cake with distinct, vibrant swirls that look like a flag in motion.
The Unexpected Star
The poke sauce is the star that turns an ordinary cake into a culinary masterpiece. It’s a blend of soy sauce, sesame oil, lime juice, garlic, ginger, and chili flakes, creating a savory glaze that’s both sweet and spicy. The sauce coats the cake like velvet, adding a layer of umami that balances the sweetness of the batter. If you’re new to poke sauce, start with a small batch to test the flavor before glazing the entire cake.
The sauce’s acidity from the lime juice keeps the glaze from becoming too sweet, while the sesame oil adds a nutty undertone that’s almost irresistible. The garlic and ginger provide a subtle heat that lingers on the palate, making each bite an adventure. If you prefer a milder version, reduce the chili flakes or omit them entirely. The sauce is versatile, and you can adjust it to suit your taste.
The key to a perfect glaze is in the consistency: it should be thick enough to cling to the cake but thin enough to spread evenly. If your sauce is too thick, add a splash of water or more soy sauce. If it’s too thin, let it simmer over low heat until it thickens. The glaze should set into a glossy sheen that’s visually striking and deliciously flavorful.
The Final Flourish
The final flourish is the whipped cream frosting, lightly sweetened with powdered sugar and a touch of lemon zest. The frosting adds a light, airy finish that balances the rich glaze and the cake’s sweetness. Whipped cream is chosen for its lightness; it won’t overpower the poke sauce, allowing the savory notes to shine through. If you prefer a denser frosting, you can use a buttercream with a small amount of the poke sauce folded in for extra flavor.
The powdered sugar ensures the frosting isn’t too sweet, while the lemon zest adds a bright citrus note that cuts through the richness. The frosting is applied in a thin layer, just enough to keep the cake moist and add a subtle tang. If you’re allergic to dairy, you can use a vegan whipped cream alternative, such as coconut cream, for a similar texture.
This final touch is what turns the cake from a simple dessert into a memorable experience. The frosting’s airy texture contrasts beautifully with the dense, savory glaze, creating a harmony of flavors that will keep guests coming back for more.
Everything's prepped? Good. Let's get into the real action.
The Method — Step by Step
- Preheat your oven to 350°F (175°C) and line a 9-inch springform pan with parchment paper. The parchment ensures easy release and a clean finish. While the oven warms, combine the flour, baking powder, baking soda, and salt in a bowl, whisking them together. This dry mix will keep the batter from developing lumps. Keep the pan ready for the batter to pour in.
- In a separate bowl, cream the softened butter and sugar until light and fluffy, about 3 minutes. The butter should be at room temperature, and the sugar should dissolve completely. This step is crucial for a moist, airy cake. Add the eggs one at a time, beating well after each addition. The batter will become silky and glossy.
- Stir in the vanilla extract, then gradually fold in the dry ingredients. Use a spatula to fold gently, keeping the batter light. Add the milk in two portions, alternating with the dry mix, to maintain the batter’s consistency. The batter should be smooth and pourable, not too thick.
- Divide the batter into three equal portions. Add the red food coloring to one portion, the blue to another, and leave the third plain for the white layer. This will create a dramatic swirl effect when poured. If you find the colors too intense, dilute them with a little milk before mixing.
- Pour the white batter first into the prepared pan, smoothing the top with a spatula. Then, alternate pours of red and blue batter, letting each layer spread slightly before the next. This creates a marbled effect that’s visually stunning. Allow the batter to sit for 2 minutes so the layers settle before baking.
- Slide the pan into the preheated oven and bake for 25 minutes. The cake should rise evenly, with a golden top that’s lightly browned. Check the cake with a toothpick; it should come out clean or with a few crumbs. If the edges start to brown too quickly, cover the pan with foil.
- Remove the cake from the oven and let it cool in the pan for 10 minutes. This step allows the cake to set, preventing it from breaking when you remove it. After 10 minutes, run a knife around the edges to loosen the cake, then release it from the springform pan. Place it on a wire rack to cool completely.
- While the cake cools, prepare the poke glaze. Combine soy sauce, sesame oil, lime juice, minced garlic, grated ginger, and chili flakes in a small saucepan. Bring to a gentle simmer over low heat, stirring constantly. Let the glaze thicken until it coats the back of a spoon.
- Once the cake has cooled, brush the glaze generously over the entire surface, allowing it to pool in the crevices. The glaze should set into a glossy sheen, giving the cake a striking appearance. Let the glaze rest for 5 minutes to firm up slightly before applying the whipped cream frosting.
- Whip the cream with powdered sugar and lemon zest until soft peaks form. Spread a thin layer of frosting over the glazed cake, smoothing it with a spatula. This final touch adds a light, airy finish that balances the rich glaze. Slice the cake and serve immediately, or cover loosely with parchment and foil for later.
That's it — you did it. But hold on, I've got a few more tricks that'll take this to another level. These insider tips will ensure your cake not only looks stunning but also tastes like a masterpiece.
Insider Tricks for Flawless Results
The Temperature Rule Nobody Follows
Many bakers bake at a high temperature, but this cake thrives at a moderate 350°F (175°C). The lower heat allows the batter to rise evenly, preventing a dense center. If you’re using a convection oven, reduce the temperature by 25°F to avoid overcooking the edges. A consistent temperature ensures a moist crumb and a beautiful golden top.
Why Your Nose Knows Best
The aroma of a cake baking is a powerful indicator of doneness. When the cake is ready, the scent will be sweet, buttery, and slightly citrusy from the vanilla and lemon zest. If the smell feels overly sweet or sour, it’s either overbaked or underbaked. Trust your nose; it’s the best judge of a cake’s readiness.
The 5-Minute Rest That Changes Everything
After removing the cake from the oven, let it rest in the pan for 5 minutes before loosening the edges. This short rest allows the cake to set, preventing cracks when you remove it. Many people skip this step, resulting in a fragile cake. The 5-minute rest is a small price to pay for a structurally sound dessert.
The Sweet‑Savory Balance
The key to the poke glaze is balancing sweetness with umami. If the glaze is too sweet, add a splash of soy sauce to cut the sugar. If it’s too salty, a touch of lime juice will brighten it. Adjusting these elements while the glaze simmers ensures a harmonious flavor profile.
The Layering Technique
When pouring the batter, let each layer spread slightly before adding the next. This creates a subtle swirl effect that’s visually appealing. If the batter is too thick, thin it with a little milk; if it’s too thin, let it sit for a minute to thicken. Proper layering gives the cake its signature flag-like appearance.
The Final Frosting Finish
Whipped cream frosting should be applied in a thin layer to keep the cake moist without overpowering the glaze. If you prefer a richer frosting, fold a tablespoon of the poke glaze into the whipped cream. This subtle infusion adds depth and keeps the cake’s savory theme intact. Finish with a light dusting of powdered sugar for a polished look.
Creative Twists and Variations
This recipe is a playground. Here are some of my favorite ways to switch things up:
Citrus Burst Variation
Swap the lime juice in the glaze for orange juice and add a pinch of orange zest. The citrus notes become sweeter, creating a bright, tropical flavor. This version is perfect for a beachside celebration or a summer gathering.
Spicy Chili Kick
Increase the chili flakes in the glaze to give the cake a fiery punch. Add a dash of cayenne pepper for extra heat. The spicy glaze pairs well with a sweet, creamy frosting for a bold flavor contrast.
Herbal Garden Edition
Introduce fresh herbs like cilantro or mint into the glaze. The herbs add a refreshing green undertone that complements the savory sauce. This variation is ideal for a garden party or a brunch with a herbal twist.
Chocolate Layer Delight
Replace the white batter with a dark chocolate batter, and keep the red and blue layers. The chocolate adds richness and depth, creating a decadent treat. Pair it with a chocolate glaze for an indulgent twist.
Vegan Version
Use plant-based butter and milk, and replace eggs with a flaxseed mixture. Whip coconut cream instead of dairy cream for the frosting. This version maintains the same flavor profile while being vegan-friendly.
Mini Poke Cakes
Bake the batter in a mini muffin tin for individual servings. Each mini cake will have its own swirl of colors and a single drizzle of glaze. These are perfect for a party platter or a dessert buffet.
Whether you’re sticking to the classic recipe or exploring one of these variations, the key is to keep the flavors balanced and the presentation striking. The cake’s versatility makes it a fantastic addition to any holiday menu.
Storing and Bringing It Back to Life
Fridge Storage
Store the cake in an airtight container in the refrigerator for up to 3 days. Wrap the cake loosely with parchment paper before placing it in the container to prevent it from absorbing fridge odors. When you’re ready to serve, let the cake sit at room temperature for 30 minutes to regain its softness.
Freezer Friendly
The cake can be frozen for up to 2 months. Wrap it tightly in plastic wrap, then place it in a freezer bag to prevent freezer burn. When ready to use, thaw the cake overnight in the refrigerator. This method preserves the cake’s moisture and flavor.
Best Reheating Method
Reheat the cake in a 325°F (165°C) oven for 10 minutes, or until warmed through. Before reheating, add a tiny splash of water to the top of the cake; this steams the cake back to perfection, keeping the glaze moist. Let the cake rest for 5 minutes after reheating, then serve warm for a comforting dessert experience.
With these storage tips, you can enjoy the patriotic poke cake well beyond the Fourth of July, making it a staple for any holiday or special occasion. The cake’s longevity, combined with its unforgettable flavor, makes it a must-try dessert for any kitchen.