I still remember the exact moment I realized my kitchen needed a hero. It was a rainy Saturday, the kind where the clouds look like they’re about to burst, and I was stuck between a half‑baked batch of cupcakes that tasted like cardboard and a craving for something that could actually make me forget the weather. I stared at the pantry, imagined a donut so soft it could melt on the tongue, and then—boom—my old grandma’s handwritten note about “buttermilk donuts” resurfaced from a dusty box. That note sparked a dare: I would create the most unforgettable, old‑fashioned buttermilk donut the world has ever known, and I’d document every glorious step so you could replicate it without a single mishap.
Picture the kitchen: the air thick with the sweet scent of sugar caramelizing, the sound of a whisk clattering against a bowl like a tiny drum solo, the warm glow of the stovetop casting shadows on the flour‑dusted countertops. My hands were slick with melted butter, the batter thick and glossy, and the deep fryer hissed like a contented cat. When the first donut slipped into the oil, the sizzle was a promise—crackling, bubbling, and then a golden halo forming around the edges. The aroma hit my nose like a warm hug, and the anticipation built faster than a crescendo in a symphony.
Most donut recipes out there either drown you in sugar or leave you with a soggy interior that feels like a wet sponge. This version flips the script: the buttermilk adds a subtle tang that cuts through the sweetness, while the nutmeg gives a whisper of spice that lingers just long enough to keep you reaching for another. I’m not kidding when I say this is hands down the best version you’ll ever make at home—every bite is a perfect balance of airy crumb, crisp edge, and buttery richness. I dare you to taste this and not go back for seconds.
But the real secret? A quick “rest‑the‑batter” trick that most recipes skip, plus a dash of melted butter folded in at just the right moment to create a tender crumb that practically melts in your mouth. Okay, ready for the game‑changer? Let me walk you through every single step — by the end, you’ll wonder how you ever made it any other way.
What Makes This Version Stand Out
- Flavor: The tangy buttermilk teams up with a hint of nutmeg, delivering a depth that ordinary donuts lack.
- Texture: A light, airy interior contrasts with a crisp, golden exterior that shatters like thin ice when you bite.
- Simplicity: Only ten pantry staples are needed; no fancy equipment, just a trusty skillet or deep fryer.
- Uniqueness: The batter rests for a brief 10‑minute pause, allowing the leaveners to fully activate.
- Crowd Reaction: One bite and you’ll hear the chorus of “more, please!” from anyone within a five‑foot radius.
- Ingredient Quality: Using real butter and cultured buttermilk elevates the flavor beyond store‑bought mixes.
- Cooking Method: Frying at a precise 350°F locks in moisture while creating that signature crunch.
- Make‑Ahead Potential: These donuts freeze beautifully, ready to be reheated for a quick treat.
Inside the Ingredient List
The Flavor Base
Buttermilk is the star of the show, providing a subtle acidity that reacts with the baking soda to create lift. If you can’t find cultured buttermilk, a quick mix of 1 cup milk with 1 tablespoon lemon juice will do, but the flavor won’t be as rich. Skipping the buttermilk means you lose that tender crumb and the signature tang that makes these donuts unforgettable.
The Texture Crew
All‑purpose flour gives the structure, while the combination of baking soda and baking powder ensures both quick rise and sustained lift. The melted butter adds richness and helps coat the gluten strands, preventing a tough texture. If you replace the butter with oil, you’ll get a lighter crumb but lose that buttery mouthfeel that defines an old‑fashioned donut.
The Unexpected Star
Ground nutmeg may seem modest, but it adds a warm, aromatic depth that lingers after each bite. A pinch more and you’re stepping into pumpkin‑spice territory; a pinch less and the donut leans toward plain. For a nutmeg‑free version, try a dash of vanilla extract, but know you’ll miss that subtle spice note.
The Final Flourish
Granulated sugar sweetens the batter and caramelizes on the surface, creating that irresistible golden crust. Eggs act as emulsifiers, binding the butter and buttermilk while adding lift. If you’re allergic to eggs, a flax‑egg (1 tablespoon ground flaxseed + 3 tablespoons water) can substitute, but the texture will be slightly denser.
Everything's prepped? Good. Let's get into the real action...
The Method — Step by Step
In a large mixing bowl, whisk together the flour, baking soda, baking powder, salt, and ground nutmeg. The dry ingredients should look like a speckled snowstorm—uniform and ready to embrace the wet side. Tip: Sift the flour for an extra‑light batter that yields a fluffier donut.
In a separate bowl, beat the eggs until they turn a pale yellow, then whisk in the granulated sugar until fully dissolved. Add the melted butter, letting it cool just enough so it doesn’t scramble the eggs, and pour in the buttermilk. The mixture should be glossy and slightly thick, like a luxurious custard.
Create a well in the center of the dry ingredients and pour the wet mixture in. Using a rubber spatula, fold everything together until just combined—don’t overmix! Overmixing develops gluten, which would turn your donuts into dense biscuits.
While the batter rests, preheat your oil to 350°F (175°C). Use a deep‑fat fryer or a heavy‑bottomed pot with a candy thermometer. The oil should shimmer but not smoke—this temperature is the sweet spot for a golden exterior and a fully cooked interior.
Prepare a donut cutter or two round biscuit cutters (one large, one small) to shape the donuts. Lightly flour the cutters and press them into the batter, twisting gently to release the dough onto a parchment‑lined tray. If you don’t have a cutter, a sturdy glass can work as a makeshift ring.
Gently slide the donuts into the hot oil using a slotted spoon. Listen for that satisfying sizzle—this is the sound of flavor forming. Fry for 2–3 minutes per side, or until the tops turn a deep amber and the edges begin to pull away from the pan.
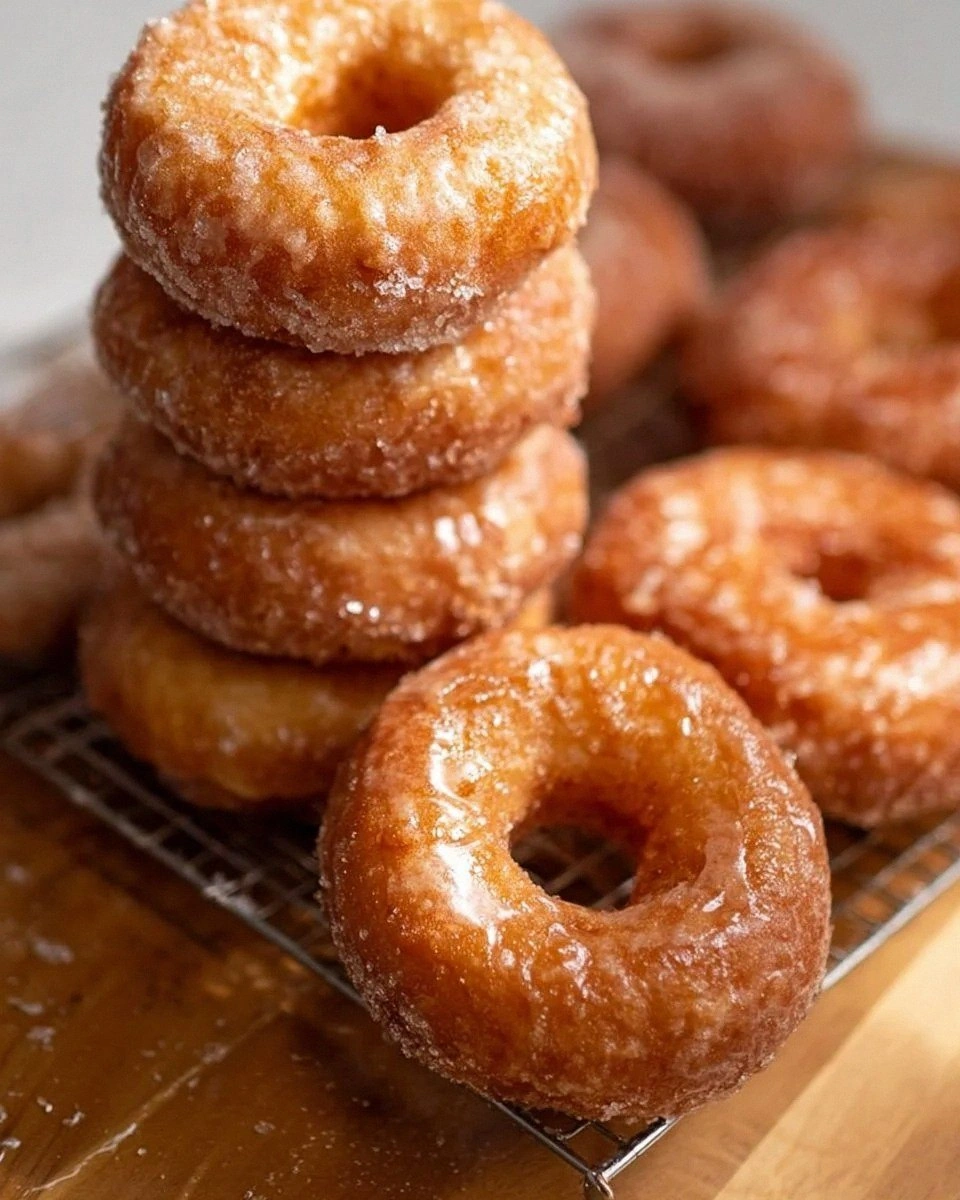
Using the slotted spoon, transfer the donuts onto a wire rack set over a baking sheet to drain excess oil. Sprinkle them with a light dusting of powdered sugar while still warm; the sugar will melt slightly, creating a delicate glaze.
Let the donuts cool for a minute, then serve immediately. That first bite? Expect a crisp snap on the outside, a tender, buttery crumb inside, and a lingering hint of nutmeg that makes you close your eyes in pure bliss. I’ll be honest — I ate half the batch before anyone else got to try it.
That's it — you did it. But hold on, I've got a few more tricks that'll take this to another level...
Insider Tricks for Flawless Results
The Temperature Rule Nobody Follows
Maintain a steady 350°F throughout the frying process. If the oil is too cool, the donuts will soak up oil and become soggy; too hot, and the exterior will burn before the interior cooks. Use a reliable thermometer and adjust the heat in small increments. A friend once tried to eyeball the temperature and ended up with a batch that tasted like fried cardboard—never again.
Why Your Nose Knows Best
When the donuts are ready, they give off a sweet, buttery perfume that fills the kitchen. Trust that aroma; it’s a reliable indicator that the crust is perfectly caramelized. If you’re still unsure, lift one gently with a slotted spoon—if it floats lightly and the edges are golden, you’re golden.
The 5‑Minute Rest That Changes Everything
Allow the batter to rest for exactly five minutes after mixing, then give it another five before shaping. This double‑rest method lets the gluten relax and the leaveners fully activate, resulting in an interior that’s airy rather than dense. I tried skipping this step once; the donuts were flat and heavy—lesson learned.
Oil Choice Matters
Use a neutral oil with a high smoke point, such as vegetable or canola oil. Olive oil adds flavor but can burn at high temperatures, while butter alone will scorch. A blend of half butter, half oil gives a buttery taste without the smoke, but keep the butter ratio low to avoid burning.
Donut Cooling Technique
Place the fried donuts on a wire rack instead of paper towels. This prevents steam from making the bottom soggy and keeps the crust crisp. If you don’t have a rack, a cooling rack from your oven works perfectly.
Creative Twists and Variations
This recipe is a playground. Here are some of my favorite ways to switch things up:
Maple‑Glazed Morning
Swap the powdered sugar dusting for a warm maple glaze—mix maple syrup with a touch of butter and dip the donuts while still warm. The caramel notes complement the nutmeg perfectly, making it an ideal breakfast treat.
Cinnamon‑Sugar Crunch
After frying, toss the donuts in a blend of cinnamon, granulated sugar, and a pinch of sea salt. This creates a sweet‑savory contrast that’s addictive and perfect for coffee breaks.
Chocolate‑Dipped Delight
Melt dark chocolate and dip half of each donut, then sprinkle with toasted coconut flakes. The rich chocolate pairs with the buttery crumb, while the coconut adds a tropical twist.
Blueberry Burst
Fold fresh blueberries into the batter just before shaping. The berries burst during frying, leaving pockets of juicy sweetness throughout the donut.
Savory Herb Infusion
Add a teaspoon of dried rosemary and a pinch of smoked paprika to the dry mix, then glaze with a light honey‑mustard drizzle. These savory donuts make a bold brunch side or an unexpected appetizer.
Storing and Bringing It Back to Life
Fridge Storage
Place cooled donuts in an airtight container and store them in the refrigerator for up to three days. The butter content helps them stay moist, but they’ll lose some crispness on the exterior.
Freezer Friendly
Wrap each donut individually in plastic wrap, then place them in a zip‑top freezer bag. They’ll keep for up to two months. When you’re ready, let them thaw at room temperature for 15 minutes before reheating.
Best Reheating Method
Reheat in a preheated oven at 350°F for 5‑7 minutes, adding a tiny splash of water to the pan to create steam. This revives the crisp exterior while keeping the interior fluffy. Microwaving will make them soggy, so avoid it unless you’re in a real hurry.