I still remember the day I ruined my best friend's birthday party with a batch of cookies that could've doubled as hockey pucks. The peanut butter filling was grainy, the chocolate base tasted like bitter disappointment, and the whole kitchen smelled like burnt dreams. Fast forward three years and about two hundred test batches later, and here we are — with what I confidently call the most addictive chocolate peanut butter cookies ever to grace a cookie sheet. I'm talking about cookies that made my neighbor's teenage son offer to mow my lawn for a whole year if I'd teach his mom the recipe. Cookies that disappeared from the office break room before I could even announce they were ready.
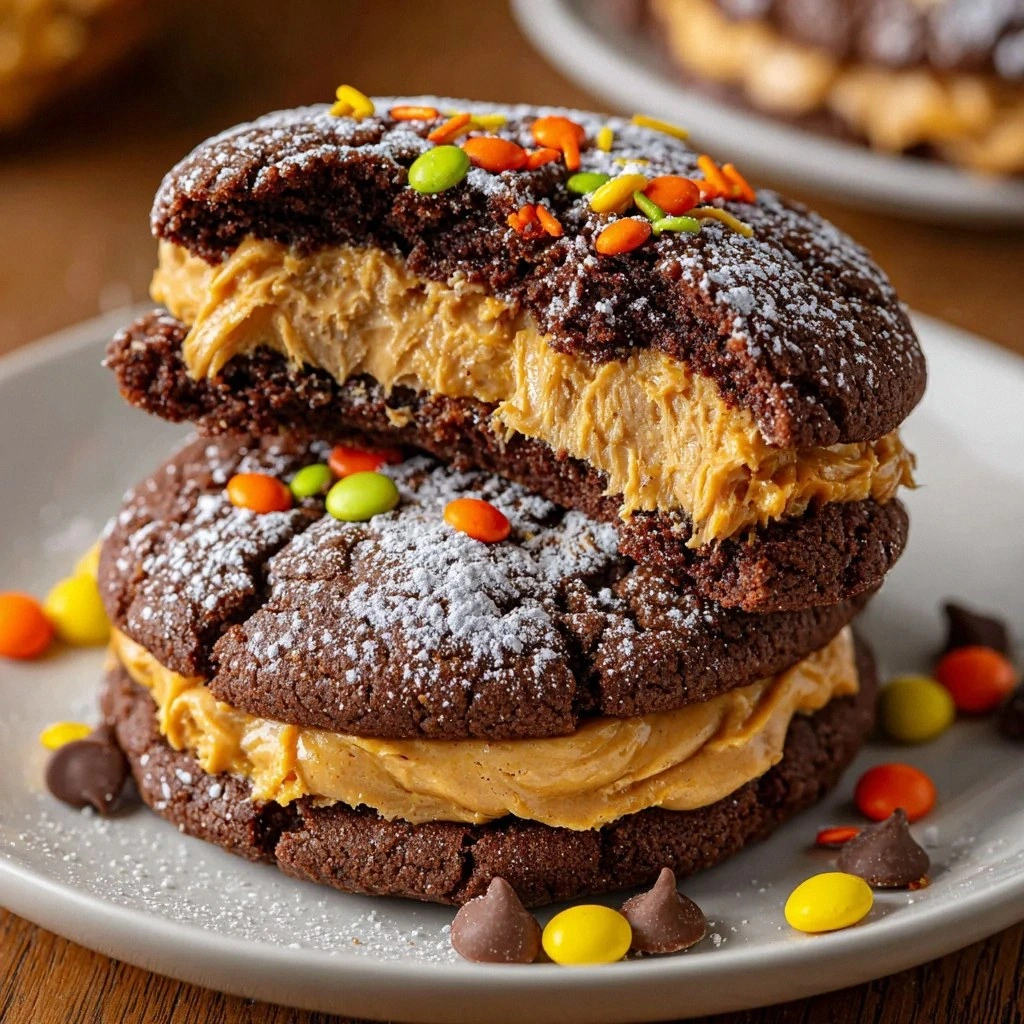
Picture this: it's 2 AM on a Tuesday night, you're standing in your kitchen wearing mismatched socks and an oversized hoodie, and the smell of warm chocolate and roasted peanuts is wrapping around you like a cozy blanket. The cookies just came out of the oven, and that first bite is pure magic — a crackly cocoa exterior gives way to a molten peanut butter center that tastes like someone bottled up childhood memories and wrapped them in cookie form. The edges have that perfect snap while the middle stays lusciously soft, and the Reese's Pieces scattered throughout add these delightful pops of color and crunch that make you feel like you're eating a party.
Most chocolate peanut butter cookie recipes get it all wrong. They either go heavy on the chocolate and drown out the peanut butter, or they make these sad, dry cookies that crumble into a mess the second you bite them. Some recipes try to be fancy with sea salt flakes on top, but they forget that the real magic happens inside the cookie. This version? It balances everything perfectly — the richness of double cocoa powders, the nutty warmth of real peanut butter (none of that processed stuff), and a secret ingredient that makes these cookies taste like they came from a boutique bakery instead of your home kitchen.
Here's what really sets these apart: we're using chocolate fudge pudding mix in the dough, which creates this incredible moisture level that stays consistent for days. We're also mixing both unsweetened cocoa and black cocoa for depth that regular recipes can't touch. But the real game-changer? That peanut butter filling gets mixed with just enough powdered sugar to make it set properly without becoming cloyingly sweet. Let me walk you through every single step — by the end, you'll wonder how you ever made it any other way.
What Makes This Version Stand Out
Double Cocoa Power: While most recipes settle for regular cocoa powder, we're bringing in both unsweetened and black cocoa powders to create a chocolate flavor that's deep, complex, and anything but one-note. The black cocoa adds this Oreo-like richness that makes people ask "what's your secret?" as they reach for their third cookie.
Pudding Mix Magic: That box of chocolate fudge pudding mix isn't just hanging out in your pantry for banana cream pie anymore. It transforms ordinary cookie dough into something that stays moist and tender for days, creating a texture that feels almost like a brownie-cookie hybrid. Trust me, once you try this trick, you'll never make cookies without it again.
Peanut Butter That Behaves: Instead of just dolloping peanut butter on top and calling it a day, we're creating a structured filling that holds its shape during baking. Mixing it with powdered sugar and a touch of milk creates this perfect consistency that stays creamy inside while the cookie sets around it — no more peanut butter lava flows ruining your cookie sheets.
Texture Playground: These cookies deliver everything you want in one bite — crispy edges that shatter like thin ice, a soft and chewy center, and those Reese's Pieces adding pops of crunch. It's like someone took all the best parts of different cookies and combined them into one perfect specimen.
Make-Ahead Champion: The dough keeps beautifully in the freezer for up to three months, and the baked cookies actually taste better on day two after the flavors have had time to meld together. This means you can be the person who always has fresh cookies ready when unexpected guests show up, or when you need comfort food at 11 PM on a Wednesday.
Crowd Psychology: There's something about the combination of chocolate and peanut butter that makes people lose their minds. I've watched disciplined dieters break their resolve, seen self-proclaimed "not dessert people" go back for thirds, and witnessed grown adults argue over the last cookie like it's the last lifeboat on the Titanic.
Beginner-Friendly Luxury: Despite tasting like they came from a fancy bakery, these cookies are surprisingly forgiving. The pudding mix covers up most beginner mistakes, the filling is more forgiving than royal icing, and even if they don't look picture-perfect, they still taste like a million bucks.
Alright, let's break down exactly what goes into this masterpiece...
Inside the Ingredient List
The Flavor Base
Peanut butter is obviously the star here, but not all peanut butters are created equal. Skip the natural stuff that separates into an oil slick on top — you want the classic creamy peanut butter that stays emulsified. It creates that smooth, rich center that makes these cookies legendary. If you only have natural peanut butter, give it a good stir and then refrigerate it overnight before using it in this recipe. The difference in texture is night and day, and since we're going for bakery-quality cookies, we need ingredients that behave consistently.
Cocoa powder forms the chocolate backbone of these cookies, and we're using a one-two punch of unsweetened and black cocoa. The unsweetened cocoa gives us that classic chocolate flavor we all know and love, while the black cocoa adds incredible depth and color. Black cocoa is what gives Oreos their distinctive flavor and color — it's been heavily Dutched to remove acidity and create an almost charcoal-like appearance. If you can't find black cocoa, you can substitute with more unsweetened cocoa, but you'll miss out on that deep, sophisticated chocolate taste that makes people wonder why your cookies taste better than everyone else's.
The chocolate fudge pudding mix is our secret weapon for moisture and flavor. It contains modified cornstarch and gums that help retain moisture, plus sugar and cocoa that enhance the chocolate flavor. Don't try to substitute with vanilla pudding mix — we need that chocolate boost. The small amount of powdered milk in the mix also contributes to browning and adds a subtle dairy richness that complements both the chocolate and peanut butter beautifully.
The Texture Crew
All-purpose flour provides the structural integrity we need, but the amount matters more than you'd think. Too much and your cookies turn into pucks, too little and they spread into sad, greasy puddles. We're using just enough to give structure while keeping them tender. The protein content in regular all-purpose flour (usually around 10-12%) is perfect for cookies — it gives enough gluten development for chewiness without making them tough like bread.
Powdered sugar in the peanut butter filling isn't just about sweetness — it's about creating the right consistency. Granulated sugar would make the filling grainy and it wouldn't dissolve properly into the peanut butter. Powdered sugar dissolves instantly, creating a smooth, pipeable filling that sets perfectly when baked. It also helps stabilize the peanut butter so it doesn't melt and run all over your cookie sheet during baking.
Whole milk appears in both the filling and the dough, adding moisture and richness. The fat in whole milk helps create a more tender crumb in the cookies, while the proteins contribute to browning. The milk in the filling helps thin the peanut butter just enough to make it manageable while adding a subtle dairy sweetness that complements the nuttiness perfectly. If you're out of whole milk, you can substitute with 2% milk or even half-and-half, but avoid skim milk — it won't provide the same richness.
The Unexpected Star
Salted butter might seem like an odd choice when most recipes call for unsalted, but here's why it works: the salt enhances all the other flavors without making the cookies taste salty. It balances the sweetness of the chocolate and sugar, and makes the peanut butter taste more intensely peanutty. The water content in butter also creates steam during baking, which helps lift the cookies slightly and contributes to that perfect texture we're after. Make sure your butter is properly softened — you should be able to press a finger into it easily, but it shouldn't be greasy or melted.
Baking soda might seem boring, but it's doing crucial work here. It reacts with the acidic cocoa powder to create carbon dioxide, which gives these cookies just enough lift to keep them from being dense. The alkaline environment also promotes browning, giving us those beautiful dark chocolate cookie exteriors. Don't substitute with baking powder — they work differently and your cookies won't have the same texture or color.
The eggs do more than just bind everything together — they're emulsifiers, which means they help the fat and water-based ingredients play nicely together. They also add moisture and protein, which sets as the cookies bake to give us that perfect chewy texture. Use large eggs at room temperature for best results — cold eggs can cause the butter to seize up, creating little lumps of fat in your dough that will melt and create greasy spots during baking.
The Final Flourish
Reese's Pieces and peanut butter chips aren't just garnish — they're texture and flavor bombs that take these cookies from great to unforgettable. The candy coating on Reese's Pieces stays slightly crisp even after baking, while the peanut butter inside melts into little pockets of joy. Peanut butter chips add concentrated bursts of peanut flavor and a different texture than the creamy filling. If you can't find Reese's Pieces, you could use chopped Reese's peanut butter cups, but the candy coating adds a unique crunch that really makes these special.
Vanilla extract might seem unnecessary when we have so many bold flavors, but it's the background note that ties everything together. It adds warmth and complexity that makes the chocolate taste more chocolatey and the peanut butter taste more peanutty. Use real vanilla extract, not imitation — the flavor difference is noticeable in recipes like this where vanilla plays more than a supporting role. The alcohol in the extract also helps carry other flavors, making the whole cookie taste more cohesive.
Everything's prepped? Good. Let's get into the real action...
The Method — Step by Step
- Start by making the peanut butter filling because it needs time to firm up in the freezer. In a medium bowl, combine the peanut butter, powdered sugar, 2 tablespoons of whole milk, vanilla extract, and salt. The mixture will seem too thick at first — this is normal. Keep stirring with a sturdy spoon or rubber spatula, pressing the mixture against the sides of the bowl to work the powdered sugar into the peanut butter. After about two minutes of determined stirring, it will suddenly come together into a smooth, play-dough-like consistency that's perfect for forming into balls. Cover the bowl with plastic wrap and pop it in the freezer while you make the cookie dough — this step is crucial because it prevents the filling from melting and disappearing into the cookie during baking.
- Now for the cookie dough — in a large bowl, whisk together the flour, both cocoa powders, pudding mix, powdered milk, baking soda, and salt until everything is evenly distributed and there are no streaks of white or brown. This step ensures that your leavening agent is evenly distributed so your cookies rise uniformly. The mixture should look like dark chocolate powder with no visible lighter spots. Set this aside while you cream the butter and sugar, but keep the whisk handy because you'll need it again.
- In the bowl of a stand mixer (or using a hand mixer), beat the softened butter and granulated sugar together on medium speed for exactly 3 minutes. I know this seems like a long time, but this is where the magic happens — the sugar crystals cut into the butter, creating tiny air pockets that give the cookies lift and structure. The mixture should become noticeably lighter in color and fluffier in texture. If you're doing this by hand with a wooden spoon, prepare for an arm workout and double the time. The butter should be fully incorporated with no visible sugar crystals, and the mixture should look like pale, fluffy clouds.
- Add the eggs one at a time, beating well after each addition. The first egg will seem to separate the butter mixture — don't panic, just keep beating and it will come back together. After adding the second egg, beat for an additional minute until the mixture is smooth and homogenous. Add the vanilla extract and beat for another 30 seconds. The mixture should be pale yellow, smooth, and slightly increased in volume from all the air you've incorporated.
- Reduce the mixer speed to low and add the dry ingredients in three additions, alternating with the remaining milk (which you'll add in two additions, starting and ending with the dry ingredients). This might seem fussy, but it prevents overmixing which can make your cookies tough. Mix just until the flour streaks disappear after each addition — you should still see some dry flour before adding the next portion. After the last addition of dry ingredients, stop the mixer when there are still a few streaks of flour visible. You'll finish mixing by hand to avoid overworking the dough.
- Remove the bowl from the mixer and fold in the Reese's Pieces and peanut butter chips using a rubber spatula. The dough will be thick and slightly sticky — more like brownie batter than traditional cookie dough. This is exactly what you want. The pudding mix and extra milk create a softer dough that stays moist during baking. Make sure the candies are evenly distributed throughout the dough, but don't overmix or they'll start to break and bleed color into the dough.
- Time to assemble — grab the peanut butter filling from the freezer. Using a small cookie scoop or tablespoon, scoop out 24 balls of the peanut butter mixture (they should be about 1 inch in diameter). Roll them quickly between your palms to make smooth balls, then return them to the freezer on a plate. Work quickly here because the filling softens fast at room temperature. If it gets too soft to work with, just pop it back in the freezer for 10 minutes.
- Scoop the chocolate dough using a large cookie scoop (about 3 tablespoons) and flatten each portion into a disk about 3 inches wide. Place a frozen peanut butter ball in the center of each disk, then wrap the chocolate dough around it, sealing the edges completely. Roll gently between your palms to make a smooth ball. The dough should completely encase the peanut butter filling with no visible seams. Place the filled cookie dough balls on a parchment-lined baking sheet, spacing them 2 inches apart. They'll spread quite a bit during baking, so don't crowd them. At this point, you can bake them immediately, or cover and refrigerate for up to 24 hours before baking.
- Bake at 350°F for 12-14 minutes — the cookies are done when the edges are set but the centers still look slightly underbaked. They'll continue to cook from residual heat as they cool. The tops should have a crackled appearance, and the edges should be just starting to pull away from the parchment. Resist the urge to overbake — these cookies are meant to be soft and fudgy, not crisp. Let them cool on the baking sheet for 10 minutes before transferring to a wire rack. This cooling period is crucial because they're too fragile to move when warm, and the peanut butter center needs time to set.
That's it — you did it. But hold on, I've got a few more tricks that'll take this to another level...
Insider Tricks for Flawless Results
The Temperature Rule Nobody Follows
Here's the thing that separates good bakers from great ones: temperature awareness. Your butter should be at exactly 68°F — soft enough to leave an indentation when pressed, but not so soft that it starts to melt. If it's too cold, it won't incorporate air properly and your cookies will be dense. Too warm and the dough will be greasy and spread too much. I keep a cheap instant-read thermometer in my kitchen specifically for butter. Also, make sure your eggs are room temperature too — cold eggs can cause the butter to seize up into little lumps that never fully incorporate, leaving you with greasy spots in your finished cookies.
Why Your Nose Knows Best
Don't rely on the timer alone — your nose is a better indicator of doneness than any recipe timing. When these cookies are perfectly baked, your kitchen will fill with the most incredible aroma of toasted chocolate and warm peanut butter. It's subtle but unmistakable — like someone opened a jar of peanut butter in a chocolate factory. If you smell this, check your cookies immediately because they're probably done. Overbaking is the number one mistake people make with these cookies. They should look slightly underdone in the center when you pull them out — trust me, they'll finish setting as they cool on the pan.
The 5-Minute Rest That Changes Everything
After mixing your dough, let it rest for exactly 5 minutes before scooping. This brief pause allows the flour to fully hydrate and the cocoa powder to bloom, creating a more complex chocolate flavor. It also lets the dough firm up slightly, making it easier to work with. During this rest, the baking soda starts to activate, which helps with the rise. A friend tried skipping this step once and ended up with cookies that spread into one giant sheet — let's just say it didn't end well for anyone involved, especially not for the cookie sheet that required an hour of soaking to clean.
The Freezer Game-Changer
Here's a pro move that will change your cookie life: freeze the unbaked, filled cookie dough balls for 30 minutes before baking. This step does three things — it prevents the peanut butter from melting too quickly, it helps the cookies hold their shape better, and it creates that perfect contrast between the crisp exterior and soft center. You can freeze them right on the baking sheet, then transfer to a freezer bag once solid. They'll keep for up to 3 months, and you can bake them straight from frozen — just add 2-3 extra minutes to the baking time.
The Cooling Ritual
Resist every urge to move these cookies before they're ready. They need to cool on the baking sheet for a full 10 minutes — no less. During this time, the peanut butter center finishes setting, the cookies firm up enough to transfer, and the residual heat continues cooking them to perfect doneness. If you try to move them too early, they'll fall apart and you'll lose that precious peanut butter filling. I set a timer and walk away because I'm too tempted to peek. After 10 minutes, use a thin metal spatula to transfer them to a wire rack where they can cool completely. The wait is torture, but it's worth it.
Creative Twists and Variations
This recipe is a playground. Here are some of my favorite ways to switch things up:
Mocha Madness
Add 2 tablespoons of instant espresso powder to the dry ingredients and substitute the whole milk in the dough with strong coffee. The coffee enhances the chocolate flavor while adding a subtle mocha note that pairs beautifully with the peanut butter. Top with chocolate-covered espresso beans instead of Reese's Pieces for an adult version that pairs perfectly with after-dinner drinks.
Salty-Sweet Addiction
Swap the salted butter for unsalted and add 1 teaspoon of flaky sea salt to the dough. Press a few flakes of Maldon salt on top of each cookie right after baking. The salt crystals create these little bursts of mineral flavor that make the sweet and nutty flavors pop in the most incredible way. It's like your taste buds are playing a delicious game of hide and seek.
White Chocolate Wonder
Replace the Reese's Pieces with white chocolate chips and add 1/2 teaspoon of almond extract to the dough. The white chocolate adds a creamy sweetness that complements the dark chocolate base, while the almond extract brings out the nuttiness in the peanut butter. It's a more sophisticated version that feels like it belongs in a Parisian café rather than your kitchen.
Spice Market Special
Add 1 teaspoon of cinnamon, 1/2 teaspoon of cardamom, and 1/4 teaspoon of cayenne pepper to the dry ingredients. The warm spices complement both the chocolate and peanut butter beautifully, while the cayenne adds just enough heat to make things interesting without overwhelming the other flavors. It's like a Mexican hot chocolate met a peanut butter cookie and had a delicious baby.
Caramel Swirl Dream
Make a quick caramel sauce by melting 1/2 cup of sugar until amber, then whisking in 2 tablespoons of butter and 1/4 cup of heavy cream. Let it cool slightly, then drizzle it over the peanut butter balls before wrapping them in chocolate dough. The caramel adds a buttery richness and creates these incredible pockets of gooey sweetness throughout the cookies.
Crunch Monster
Add 1 cup of crushed pretzels to the dough along with the candies, and use crunchy peanut butter for the filling. The pretzels add salt and crunch that create an addictive sweet-salty dynamic, while the crunchy peanut butter gives you little bits of peanut throughout the filling. It's like someone took all the best parts of a snack mix and turned them into a cookie.
Storing and Bringing It Back to Life
Fridge Storage
These cookies stay fresh in an airtight container at room temperature for up to 5 days, but here's the key — add a slice of bread to the container. The bread will stale instead of your cookies, keeping them soft and chewy. Replace the bread slice every day or two. Store different flavors separately so they don't exchange aromas. If your kitchen is particularly warm or humid, refrigerate them, but let them come to room temperature before serving — cold dulls the flavors significantly.
Freezer Friendly
These cookies freeze beautifully both before and after baking. For unbaked dough, flash freeze the filled cookie balls on a baking sheet, then transfer to a freezer bag with parchment paper between layers. They'll keep for up to 3 months and can be baked straight from frozen — just add 2-3 minutes to the baking time. For baked cookies, let them cool completely, then freeze in a single layer before transferring to a container. They'll keep for 2 months and can be thawed at room temperature for 30 minutes or warmed in a 300°F oven for 5 minutes.
Best Reheating Method
To revive day-old or refrigerated cookies, wrap them in a damp paper towel and microwave for 8-10 seconds. The steam from the towel rehydrates them, making them taste freshly baked. For frozen cookies, thaw at room temperature for 30 minutes, then warm in a 300°F oven for 5-7 minutes. Add a tiny splash of water to the baking sheet before reheating — it creates steam that brings back that fresh-from-the-oven texture. Never reheat them in the microwave without the damp paper towel or they'll turn into rubber.